

Ill take it ...

I was excited when I found this cabinet because of the size. Most of the time I must turn away
from overly large beautiful pieces because Im not physically capable to work on them alone or they wont fit in my home to be worked on. This was one of those larger pieces I could consider because it wasnt too large and it was 2 pieces.
Ill get straight to the before pictures so you can understand my vision with this project.

Mid 70s china cabinet with glass panels everywhere in the upper portion.
The glass just had to go ...

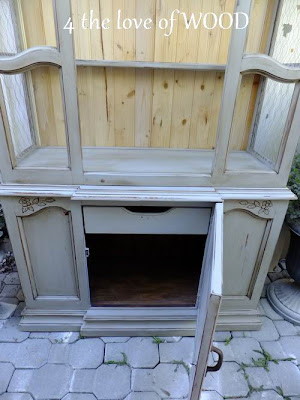
Below you can see the upper cabinet completely stripped down, no glass, no backing.
I prefer to work on cabinets from the open back, especially to get a good paint job inside.

The original backer was a piece of cardboard with a picture of wood on it.
I redid the back with thin tongue and groove bead board. Every now and then I find
a package or 2 while yard saling, just enough to complete some of my projects.


I seriously wanted this cabinet to look like it was from an old farm house. I painted it with an ASCP
light grey mix, distressed it, sealed the Chalk Paint with Minwax Natural, then got the final look with
Annie Sloans Dark Wax. The dark wax does such a great job of simulating age.

The hardest part on this project by far was installing *CHICKEN WIRE* in the upper cabinet
but it looks absolutely perfect on this piece and there is no doubt its from a farmhouse now.
Chicken wire is also known as hex wire, keep that in mind if you are in
the hardware store about to ask for it. When working with it you MUST have patience,
you SHOULD wear gloves, and the right stapler and cutters might help calm the process a little.
Once again my roll was found at a yard sale.

 Read More..
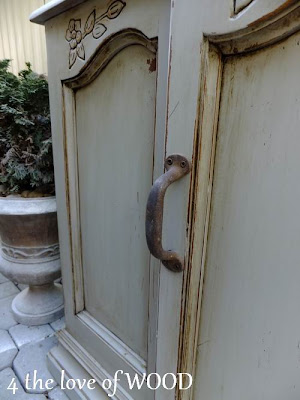
Inside the lower cabinet is open storage with a cutlery drawer front and center.
I added the perfect rustic old handle to the door.
 Since it was rather rough on the edges, I decided to round it down and promptly broke it:
 Good grief. Since the rest of it was in one piece, I decided to use it temporarily as a holder while I worked on the pvc portion of the chuck. I inserted the pipe into the slot on the birch base and placed another piece of wood on top of the pvc pipe and placed the whole thing between centers to mark and drill it:
 The walls of the pipe will have slots cut into them and also a large hole-slot drilled and cut into it to allow the handle of the scoop to protrude while the piece is being turned. So I marked and drilled and cut into the sides of the pipe with a drill and a hack saw:
 And here is a photo of the completed chuck with the hose clamp in place:
 With that done, I removed the broken base and re-made it out of a piece of solid maple. Here is a photo of the completed chuck:
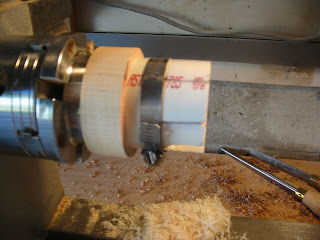 I glued the pipe and the base together and they are drying in the shop.
 Hmmm...now it looks like a small lemon on a stick and the reason it does is that the x, y, z axis of the piece are not equal in length, or in other words, it isnt round yet. So back to the lathe we go for more turning, sanding and finally I cut it off:
 ...too soon. Its too large to fit into the pipe. So Im going to manually cut down the ends of the blank until it fits. Oh well, its a nice morning to work outside.
 When this is placed back on the lathe in a couple of hours, I will shave off the top of the scoop and then hollow it out. If all goes well, I should wind up with a scoop with the handle attached. The glue really needs to dry hard so Ive removed the blank and Ive set it aside. Ill go back to it later this afternoon.
 And here is a side shot:
 Its been polished and its ready for delivery. Ill have to plug the holes in the base where the screws for the faceplate were drilled but that will only take a minute. Im going to go and email the happy owner.


 This last method is used quite a bit as everything from bowls to plates, to small pieces of wood can be attached in this manner.
 I would like to make a small coffee scoop that has a capacity of about 1-2 tablespoons so I purchased a 2 inch diameter pvc pipe this morning and Im going to turn a piece of red oak into a blank that will fit inside of the pipe.
 While this is drying (and Ill talk about this more tomorrow) Im going to place the red oak block on the lathe and get it turned down. Here is a photo of it placed between centers. This means that both ends of the block are attached to the lathe. This is a very safe method of turning and it cuts down on the amount of vibration that invariably creeps into a turning block of wood. Heres the photo:
 Next, Im going to turn this block into a cylinder:
 Then Im going to mark off the major sections of the cylinder for turning. This will consist of the scoop or cup portion and the handle portion:

 Ive partially turned the handle and here Im beginning to round down the cup portion. Im beginning to cut from right to left and Im cutting to the center where you can see a faint line that marks the center of the cup portion. Heres some more photos:
 Here Ive reversed the turning and Im cutting the other end.
 Now Ive rounded down both ends of the cup portion. Hmmm...this looks like a lemon on a stick....
 Its rounder but its still a little too big and not quite round enough to fit inside of the pvc pipe so tomorrow Ill turn it down still more and Ill make the collet chuck for the final turning and youll see how this whole thing is going to go together.
 Next, I cut out a section of the plank, marked it and cut it into a circle on the bandsaw:

 This blank is going to be mounted on the lathe with a faceplate. This screws directly onto the blank of wood with wood screws and then in turn is screwed onto the lathe:

 The grain in the wood appears most prominently on the other side of this blank so the bottom of the plate will be turned first on the side in the photo above.

 Now its time to put the metal to the board. Here is a photo of the tools Ill be using. Lathe chisels are long-handled tools made out of heavy steel to help dampen the vibration from cutting. In the photo, the first tool on the left is the basic roughing gouge (fondly named Bob after the father of a good friend of mine) that I use quite a bit for basic roughing out of wood and to flatten surfaces with. The chisel next to that is a 3/8 inch bowl gouge. This tool is used to create concave shapes, like the interior of a bowl or plate. Next to that we have a spear-shaped chisel called a parting tool. This will be used to cut the tenon on the bottom of the plate. Lastly, is a skew chisel, a fearsome looking thing and one of my most used tools. I use this to cut convex shapes and for smoothing. Heres the photo:
 Time to begin. I like to turn the periphery first and leave the center intact. This helps to dampen any vibration caused by the spinning wood. Here you can see the edge begin cut and its early shaping:
 The next several photos show the progression of the cutting and shaping and the cutting of the tenon:

 In this photo you can clearly see the tenon cut in the center of the dish. This allows for the attachment of a special wood vice that will fit into that slot and then screw onto the lathe:
 Ok, the back is finished. Time to take off the faceplate, attach the wood vice and flip the dish around:
 Lets start cutting. The edge is cut first, just like the bottom edge was and its smoothed:
 Now its time to begin hollowing out the center:
 Im going to leave a lip between the edge band and the center portion of the bowl. That is that ridge you see in the photo.
 And Im going to continue to hollow out the center:
 At this point I stopped and took the dish off the lathe. Its beautifully turned at this point but it might need to be deepened at this point so Ive taken it off and taken it upstairs to look at it for a while and to give myself time to make a decision. Here it is: