Be creative with storage.
Im always looking for that space in our home that is not being used to its full potential. Think about |
| http://blogspot.ca/2012/12/how-to-hide-hideous-printer.html |
Read More..
Free woodworking plans for a DIY small closet organizer for closets 3-5 wide.
If youre stuck with a small closet theres not much you can do other than make more efficient use of the space. This small closet organizer does just that. It increases the closet rod by 20% and more than quadruples the amount of shelf space compared to an original design of a single shelf and rod.
Lack of shelf space tends to be the reason closets get so cluttered in the first place. We tend to use closets for more than just clothes. Anything that we dont want to throw away yet dont want out in the open gets thrown in the closet where it tends to get forgotten. If you havent seen your closet floor in ages because its pilled high with bags, boxes and shoes, thats a clear indication you lack enough shelf area in your closet. This closet organizer design aims to fix that problem.
Dimensions
Use these plans as a guide and customize them to your needs. The plans should work well for reach in closets between 3 to 5 wide and 24" deep. If your closet is larger, see my Closet Organizer Plan for 5 - 8 closets.
In this example were using a 48" wide by 24" deep reach-in closet that has an 11" space between the left side wall and the door trim. Make any necessary adjustments to suit your closet. Here is the floor plan of the closet well be working in.

If youre closet doesnt have much space between the sidewall and the door trim you wont be able to include the extended lower shoe shelves. You can still include the shoe shelves but they will only be 15" deep like the other shelves.
What Youll Need
Materials
- (1) 4 x 8 sheet of 3/4" hardwood veneer plywood
- (1) 2 x 4 sheet of 3/4" hardwood veneer plywood
- about 32 of edgebanding
- (2) 8 1x4 boards for main supports (match plywood species)
- (4) 8 1x2 or 1x3 boards of shelf supports
- (1) Knape Vogt 96in Oval Tubing Chrome

- 3-1/2" wood screws for attaching supports to studs
Tools
- Table saw, or circular saw with guide to cut plywood
- Miter saw or miter box to cut boards
- Kreg Pocket Hole Jig
- Drill
- Pilot hole/counter sink bits
- Level
- Tape measure
- Pencil
- Iron
- Utility knife or edgebanding trimmer
Cut List
- (1) 48" x 24" 3/4" Plywood Top Shelf
- (1) 82-1/2" x 15" 3/4" Plywood Main Divider
- (1) 42 x 15" 3/4" Plywood Lower Cabinet Side
- (1) 24-1/4" x 15" 3/4" Plywood Lower Cabinet Top
- (4) 15" x 15" 3/4" Plywood Shelves
- (3) 15" x 24" 3/4" Plywood Shoe Shelves
- Assorted 1x4 boards for main supports
- Assorted 1x2 or 1x3 lengths for shelf supports
Cut Plan
The size of your closet will most likely be different so double check the cut plan after you make the necessary adjustments to the component dimensions.
3/4" Plywood
The main parts of the closet organizer are cut from 3/4" hardwood veneer plywood. Two sheets where used for this plan, 1 full 4 x 8 sheet and one 2 x 4 quarter sheet.

Some of the cutoffs can be used for the 2" shelf supports but you might find it easier to use 1x2 or 1x3 boards that match the species of plywood you selected instead. It will save time in making all those little cuts and edgebanding.
1x4 Boards
The 1x4 boards are used for the top support as well as the lower support. The species of wood should match the plywood you selected and be finished the same way. Youll need 2 8 boards. Cut plan is not included because it will depend on your closet dimensions.
1x2 or 1x3 Boards
There isnt enough scrap on the plywood to create enough supports for the sweater and shoe shelves on the left of the organizer. You may want to forego the plywood supports and just use boards instead to minimize the cuts in plywood which can be time consuming if you dont have a table saw. Using boards also means you wont have to edgeband the supports that will be visible.
If youre using boards for all the shelf supports youll need 4 8 boards.
Step 1: Cut and Finish Parts
Its best to cut out all the parts and finish them before installing the closet organizer. Make any adjustments necessary to suit your closet size, cut out the parts, apply edgebanding to the edges that will be visible, sand smooth with 80 then 120 grit sand paper, finally either prime and paint them or stain and seal them.
Oil based paints and finishes are not a good idea for closets because they can out gas for a long time and make your clothes smell. Instead use low VOC water based paints or water based stain and a water based finish such as Minwax Water-Based Polycrylic.
Step 2: Prepare Your Closet
While your waiting for the closet organizer components to fully cure, get your closet ready for the new organizer.
Empty out the closet and store your clothes in a safe place. Carefully remove the old closet shelf, rod and other boards that were a part of that configuration.
Patch the walls with joint compound, sand and then prime and paint with a low VOC water based paint.
Step 3: Mark For Top Support
Use a level to find the highest point in the closet floor along the back wall. Houses can shift over time and the floors wont always be level.
From the high point in the floor measure up 82-1/2" and draw a level line (in pencil) on the back wall, both side walls, and the front section where the shelves will be.
Please note that to make it easy to show the installation, some of the walls are not visible.
Step 4: Install Top Support
Measure and cut the 1x4 top support and screw it into the walls using 3-1/2" wood screws making sure to screw into the studs. The top of the board should align with the level line drawn in the previous step.
Install the supports in the order shown. Starting with the return wall, next the left side wall, the right side wall and finally the back wall. Check your stud locations on the right wall and cut that support long enough to be screwed into at least 2 studs, one in the corner, one towards the end.
Drive 2 screws at each stud location.
Step 5: Install Divider
Draw a plumb line using a level 15" from the left wall (the wall where the shelves will be.)
Prepare the divider by cutting a notch at the top to fit around the top support 1x4 and at the bottom to fit around the baseboards.
Drill 2 pocket holes at the top notch to be able to attach it to the top support.
Align the left side of the Divider with the plumb line and drive 2 screws through the top pocket holes. At the bottom use an L bracket to attach the divider to the floor, making sure it stays plumb.
Step 6: Install Lower Support
Draw a level line on the right side of the Divider, 42" up from the floor. Install the Lower Support 1x4 so the top is flush with the level line. Use 3-1/2" wood screws to secure the Lower Support into studs. Make sure that when you install the Lower Support you to not push the Main Divider out of plumb.
Secure the main divider to the end of the lower support using 2 1-1/2" wood screws. Drill pilot holes before driving the screws to prevent splitting.
Step 7: Assemble Lower Cabinet
The lower cabinet defines the bottom hanging area. It consists of the top and side and gets attached to the main divider.
Begin by drilling the necessary pocket holes in both pieces. In the Lower Cabinet Top there are 3 pocket holes on the side to attach to the main divider. In the Lower Cabinet Side there are 6 pocket holes. 3 on the top to attach to the Lower Cabinet Top, and 3 on the bottom to attach to the floor. You can also use an L-Bracket to attach the side to the floor instead.
After you drill the pocket holes, attach using the appropriate pocket screws as shown below.
Step 8: Install Lower Cabinet
Position the assembled Lower Cabinet over the Lower Support as shown. Youll need to cut a notch on the bottom of the Lower Cabinet Side to fit around your baseboards.
Make sure its level and plumb all around and secure it to the Main Divider using pocket screws, to the Lower Support from the top and side using 1-1/2" wood screws that are countersunk (drill pilot holes to avoid splitting), and finally to the floor using pocket screws or L brackets.
Step 9: Install Top Shelf
Check to make sure the Top Shelf fits properly. Trim it to size if necessary then place it so it rests on the top supports.
Screw it in place using 1-1/2" wood screws that are predrilled and countersunk. Screw it down into the top supports as well as the top of the Main Divider.
Step 10: Install Closet Rods
Mount the Closet Rod Flanges, cut the pole to size using a hacksaw and mount them as shown.
Step 11: Install Shelf Supports
Mark out level lines on the walls where the shelves will be installed. You can space the shelves whichever way works for you. A good starting point is about 12" spacing for sweater shelves and about 7" spacing for shoe shelves.
Use 3-1/2" wood screws driven into studs to install 2" strips of plywood (or 1x2 or 1x3 boards) at the marked lines to support the shelves as shown.
Step 12: Install the Shelves
Place the shelves on the shelve supports. Trim to size if necessary. Attach the shelves to the shelf supports by screwing down from the top with 1-1/2" wood screws that are pre-drilled and countersunk. On the side where the shelf meets the divider attach the shelf to the divider using pocket hole screws as shown.
For the lower shoe shelves that extend to the front wall, youll need to mark and cut out an angle from the cabinet to behind the door molding.
Your closet organizer is now complete and ready for your clothes.
Read More..
Hi Everyone,
I felt pretty darn good today so I decided to go and do a little work today on the next project, a coffee scoop out of some red oak I have in my wood pile.
When ever Im considering a project the first thing that always comes up is how to attach a project to the lathe. There are numerous ways to do this: a piece of wood can be attached to between centers (Ill show you a picture of that in a minute), it can be attached to a faceplate if its a dish or a bowl, or it can be placed inside of a specialized vice that screws onto a lathe:

This last method is used quite a bit as everything from bowls to plates, to small pieces of wood can be attached in this manner.
One type of specialized vice is called a collet chuck. These are chucks that hold small round or small square pieces of wood tightly enough so they can be turned on a lathe. I dont have a collet chuck and Ive been wanting to try to do some small diameter turnings so a collet chuck is a must. But being not employed for years on end means that Im not exactly rolling in dough so the answer is to make one out of some common stuff that can be found in the average garage.
To do this Im going to follow the instructions in a really great book my husband got me called Fixtures and Chucks for Woodturning by Doc Green (ISBN: 978-1-56523-519-9). This is an excellent reference for the novice or experienced wood turner and I highly recommend it. We will be making a collet chuck out of some scrap lumber, a section of pvc pipe, and a hose clamp:

I would like to make a small coffee scoop that has a capacity of about 1-2 tablespoons so I purchased a 2 inch diameter pvc pipe this morning and Im going to turn a piece of red oak into a blank that will fit inside of the pipe.
The first thing I did was cut off a 2" section of the pvc pipe on the table saw and I also cut a 6 inch section off of the red oak block. I set aside the red oak for a few minutes and cut out two small circles from a scrap piece of pine-one piece is 2 inches in diameter and other other is 3 inches in diameter and Ive glued them together thus:

While this is drying (and Ill talk about this more tomorrow) Im going to place the red oak block on the lathe and get it turned down. Here is a photo of it placed between centers. This means that both ends of the block are attached to the lathe. This is a very safe method of turning and it cuts down on the amount of vibration that invariably creeps into a turning block of wood. Heres the photo:

Next, Im going to turn this block into a cylinder:

Then Im going to mark off the major sections of the cylinder for turning. This will consist of the scoop or cup portion and the handle portion:
And now Im going to begin turning. Youll see the handle and the cup or scoop portion of the red oak block begin to take shape in the following photos:

Ive partially turned the handle and here Im beginning to round down the cup portion. Im beginning to cut from right to left and Im cutting to the center where you can see a faint line that marks the center of the cup portion. Heres some more photos:

Here Ive reversed the turning and Im cutting the other end.

Now Ive rounded down both ends of the cup portion. Hmmm...this looks like a lemon on a stick....
Next, Ive taken the turning off of the lathe and tried to fit it into the pvc pipe, which it will need to do if its going to fit inside of our collet chuck that were going to make tomorrow. Hmmm....the cup portion is far too large to fit inside so its back on the lathe for more turning:

Its rounder but its still a little too big and not quite round enough to fit inside of the pvc pipe so tomorrow Ill turn it down still more and Ill make the collet chuck for the final turning and youll see how this whole thing is going to go together.
See you tomorrow,
VW


 Since it was rather rough on the edges, I decided to round it down and promptly broke it:
 Good grief. Since the rest of it was in one piece, I decided to use it temporarily as a holder while I worked on the pvc portion of the chuck. I inserted the pipe into the slot on the birch base and placed another piece of wood on top of the pvc pipe and placed the whole thing between centers to mark and drill it:
 The walls of the pipe will have slots cut into them and also a large hole-slot drilled and cut into it to allow the handle of the scoop to protrude while the piece is being turned. So I marked and drilled and cut into the sides of the pipe with a drill and a hack saw:
 And here is a photo of the completed chuck with the hose clamp in place:
 With that done, I removed the broken base and re-made it out of a piece of solid maple. Here is a photo of the completed chuck:
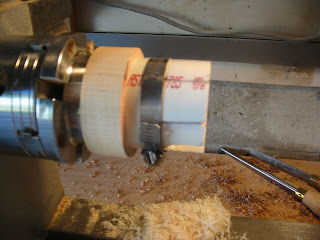 I glued the pipe and the base together and they are drying in the shop.
 Hmmm...now it looks like a small lemon on a stick and the reason it does is that the x, y, z axis of the piece are not equal in length, or in other words, it isnt round yet. So back to the lathe we go for more turning, sanding and finally I cut it off:
 ...too soon. Its too large to fit into the pipe. So Im going to manually cut down the ends of the blank until it fits. Oh well, its a nice morning to work outside.
 When this is placed back on the lathe in a couple of hours, I will shave off the top of the scoop and then hollow it out. If all goes well, I should wind up with a scoop with the handle attached. The glue really needs to dry hard so Ive removed the blank and Ive set it aside. Ill go back to it later this afternoon.
 And here is a side shot:
 Its been polished and its ready for delivery. Ill have to plug the holes in the base where the screws for the faceplate were drilled but that will only take a minute. Im going to go and email the happy owner.


 Move things along.


