


Ive received many messages asking for this next tutorial, so no more need to pass by these chairs.
Im going to show you how to get the back of this style chair upholstered.

We are going to start at the point after all the stripping and frame is already refinished.

I use a hand held, arm powered stapler with 1/4" staples.
I do have an electric stapler but because of the safety feature
it will not work with the tight ledge of this chair.
Here is a close up of the frame profile.
You can even see where the old staples were.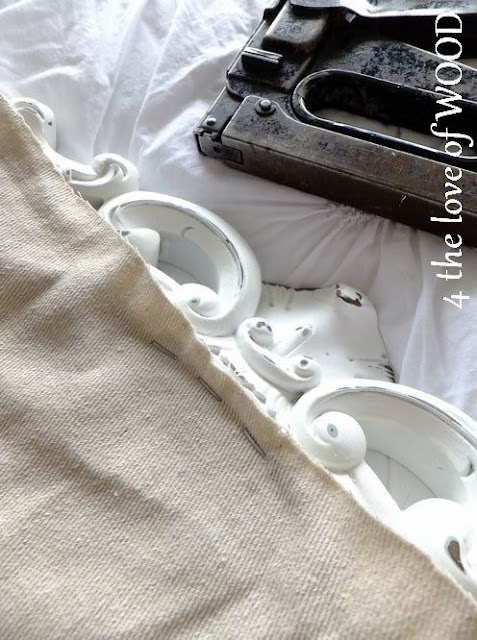
Start by shooting 3 staple in the top edge to start securing your fabric.


 Read More..
Figure out the best angle for your stapler to be used with your chair.
Here is a close up of where the staples are actually going into the frame.
The next place to attach your fabric is directly opposite of your first three staples,
down on the bottom edge.

Then across from each other.
Hold your fabric taught each time you shoot every staple in.


Once you have your 4 points of contact, simply go around attaching your fabric
with staples ever inch, continue to pull the fabric taught.


Once you are finished stapling, trim your fabric to 1/2 inch excess, I use small scissors cause
they are easier to work with in close corners.
Tip and turn your chair so everything you are doing is comfortable for your hands.
Make sure to pick a good work surface, I use my bed every time.
This overhang of fabric will simply be folded in and hidden inside of STEP II
You can bounce a coin off the fabric like a drum if done well.
Step II Filler and Front Fabric:
http://blogspot.ca/2013/06/how-to-upholster-open-chair-back-step-ii.html
Read More..
New equipment and an owie
Minggu, 01 Mei 2016
Hi Everyone,
Well, I got an anniversary present today--a new disc sander. This is a heavy duty critter that will be bolted down to a work bench that is in the planning stages. It spins very fast, has an adjustable table in front of it and I can do a lot of finish sanding on it.
In my elation to use it, I accidently caught my fingers on the surface of the spinning disc and Ive partially sanded the tips of several fingers of my left hand. So Im upstairs, smarting a bit from that.
And my back is hurting a bit this afternoon. Im going to take the rest of the evening off. And possibly tomorrow, too.
VW
Read More..
Well, I got an anniversary present today--a new disc sander. This is a heavy duty critter that will be bolted down to a work bench that is in the planning stages. It spins very fast, has an adjustable table in front of it and I can do a lot of finish sanding on it.
In my elation to use it, I accidently caught my fingers on the surface of the spinning disc and Ive partially sanded the tips of several fingers of my left hand. So Im upstairs, smarting a bit from that.
And my back is hurting a bit this afternoon. Im going to take the rest of the evening off. And possibly tomorrow, too.
VW
3 ROOSTERS A TIGER AND AN EGG vintage grain cabinet
Selasa, 26 April 2016
I have fallen in love again with another finished project,
and so has its potential new owner.
The base cabinet I used for this kitchen unit is made of Tiger Oak.
Im sure many of you have read an online furniture ad mentioning Quarter Sawn or Tiger Oak,
this is what it looks like.
For those wondering exactly what that means or how its done:
The log is first cut longitudinally into wedge-shaped quarters. Then the quarters are cut along each plane of the wedge, with the cuts running radially toward the center of the log. The cuts are made alternately on each face of the wedge, producing narrower and narrower boards as the wood is cut away. Because the grain of quarter-sawn wood is straighter than that of flat-sawn lumber, the quarter-sawn wood is significantly more stable.
This french grain graphic I used can be found at the Graphics Fairy.
The top portion I bought at a yard sale over a year ago and its been waiting for the right companion.
Its a solid maple Vilas piece.

You can find a side by side before and after pic of this vintage grain cabinet here.
This FARMERS MARKET sign with rooster accent
and 2 lucky Portuguese Roosters are available on Georges Etsy shop
FIRST FINDS
Read More..
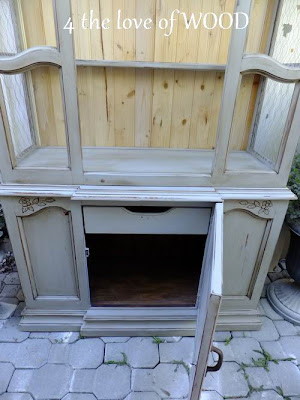
MAKING AN OPEN AIR DISPLAY CABINET farmhouse grey china cabinet
Senin, 25 April 2016
Ill take it ...
I was excited when I found this cabinet because of the size. Most of the time I must turn away
from overly large beautiful pieces because Im not physically capable to work on them alone or they wont fit in my home to be worked on. This was one of those larger pieces I could consider because it wasnt too large and it was 2 pieces.
Ill get straight to the before pictures so you can understand my vision with this project.
Mid 70s china cabinet with glass panels everywhere in the upper portion.
The glass just had to go ...
Below you can see the upper cabinet completely stripped down, no glass, no backing.
I prefer to work on cabinets from the open back, especially to get a good paint job inside.
The original backer was a piece of cardboard with a picture of wood on it.
I redid the back with thin tongue and groove bead board. Every now and then I find
a package or 2 while yard saling, just enough to complete some of my projects.
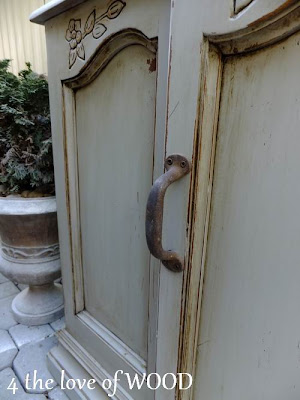
I seriously wanted this cabinet to look like it was from an old farm house. I painted it with an ASCP
light grey mix, distressed it, sealed the Chalk Paint with Minwax Natural, then got the final look with
Annie Sloans Dark Wax. The dark wax does such a great job of simulating age.

The hardest part on this project by far was installing *CHICKEN WIRE* in the upper cabinet
but it looks absolutely perfect on this piece and there is no doubt its from a farmhouse now.
Chicken wire is also known as hex wire, keep that in mind if you are in
the hardware store about to ask for it. When working with it you MUST have patience,
you SHOULD wear gloves, and the right stapler and cutters might help calm the process a little.
Once again my roll was found at a yard sale.

 Read More..
Inside the lower cabinet is open storage with a cutlery drawer front and center.
I added the perfect rustic old handle to the door.
FOUR LETTER WORDS THE SECRET TO AN AMAZING CHRISTMAS BED
Senin, 21 Maret 2016
My four letter word is *SNOW*. What would your four letter word be?
Careful now we are talk about Christmas!
For this decorating project I printed out letters on regular white paper, cut them out, and taped
them in place on my window. The snow flakes are tree ornaments also secured with tape. You can do
this on most any window or mirror and you just have to think of how many letters you want your
word to have and think of all the Christmas words available to you ...
JOY - ELF - TOY - NOEL - STAR - DEER -SNOW - MERRY - SANTA - PEACE - FAMILY
and so on.


Now for my easy Christmas bedding tip ...
What I have done is buy an inexpensive red plaid sheet set and paired it with my white bedding.
A sheet set usually comes with pillow cases, a flat sheet, and fitted sheet. This is more than enough
red and plaid to set the holiday mood in the bedroom without buying a new comforter or cover.
You can either have a large fold over of the flat sheet or you can use it to cover everything.
Ive also added a warm knitted throw at the foot and this can all be used long after Christmas.
Try to avoid spending money on bedding that is exclusively Christmas themed.


********************************************
Here is a peak at where I store my Christmas stuff, its a storage box spring under my bed.
Years ago I was about to get rid of my box spring all together until I found this option.
My Christmas decorating has been stored in there ever since.
*************************************************
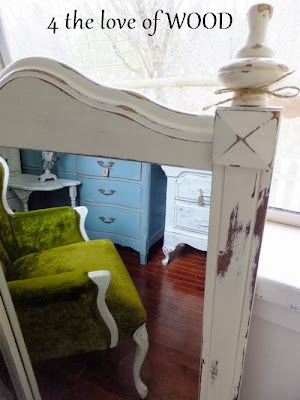
And I have added some new mirrors to the Accessories page:
http://blogspot.ca/p/mirror-for-sale.html
This large ornate one would be great just about anywhere in your home.
And below I have 2 of these vintage tall wood mirrors.
Maybe use both in a hall way or just one for a dressing mirror.
OLD ENOUGH TO KNOW BETTER YOUNG ENOUGH TO LEARN how to add an apron to your leaf
Jumat, 18 Maret 2016
At the last minute before your husbands fun loving family shows up for dinner
you run to your master bedroom trying to remember where the extra leaf for
the kitchen table was stored. Finally with victory you find it stashed in the back of the closet,
behind your husbands laundry bin. Thankfully he uses the floor for his laundry
and not the bin so getting the leaf out should be quick and easy.
Once you slip through the hanging clothes and stubbing your toe on the sewing machine
also sitting on the floor on the closet, which reminds you that you should have
hemmed the dress you had planned to where this evening, you pull out the leaf with victory
still on your side and head straight for the dining table. Thank god the kids havent
come in from their busy day in the yard of hosing the dog down to set the dishes out yet.
Now its just a slight bit of acrobatic moves to get the table pulled apart by yourself
and get the leaf in place.
Seriously!! ... now youre confronted with a big gaping hole pointed right at the door way
where your in-laws will be entering the room.
"I could turn the table and hope no one will see" ...
but that will block Beckys escape to her room when
aunt Patty starts complaining about her fancy $200 shoes that dont fit right
and cousin Jeremy staring inappropriatly (really he just has a lazy eye)
"The good table cloth will cover it up and solve all the problems!" ...
There is no time to start looking. The casserole timer is going off and the rug has not
been vacuumed for that would disrupt the game that Henry is watching.
Once you give in and start tearing open drawers and cupboards you find the good table cloth
still has mustard stains from Jacks birthday party that you had hoped might vanish if left alone.
If you are tired of this always happening to you,
simply follow these 7 steps. 

#1 Measure the height and length you need in a new apron board.
#2 You will need to get 2 boards cut to fit the measurements you have taken,
1 for each end.

#3 With some coarse sand paper smooth the edges on your new boards.
#4 Measure the distance in from the edge where they need to go.
#5 Screw the boards into place using corner brakets. 
#6 Double check how it looks by installing the leaf in your table.
#7 Once everything looks good paint the new apron piece to match your table.
A few unpractical alternatives might include:
Burn everything you cook then you wont be asked to cook dinner.
Dont clean your house then no one will want to come for dinner
Marriage comes with in-laws, think carefully before deciding.
Langganan:
Postingan (Atom)