

Good Morning Everyone,
I got up early today and re-started the coffee scoop project. Heres how it went:
I decided to remake the wooden base for the pvc collet chuck. The original one was made out of pine and it didnt look nearly strong enough to withstand the shearing forces produced by a lathe. So I discarded it and remade it out of some red birch:
 Since it was rather rough on the edges, I decided to round it down and promptly broke it:
 Good grief. Since the rest of it was in one piece, I decided to use it temporarily as a holder while I worked on the pvc portion of the chuck. I inserted the pipe into the slot on the birch base and placed another piece of wood on top of the pvc pipe and placed the whole thing between centers to mark and drill it:
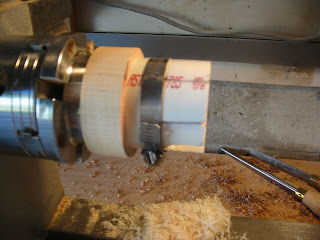
 The walls of the pipe will have slots cut into them and also a large hole-slot drilled and cut into it to allow the handle of the scoop to protrude while the piece is being turned. So I marked and drilled and cut into the sides of the pipe with a drill and a hack saw:

I got up early today and re-started the coffee scoop project. Heres how it went:
I decided to remake the wooden base for the pvc collet chuck. The original one was made out of pine and it didnt look nearly strong enough to withstand the shearing forces produced by a lathe. So I discarded it and remade it out of some red birch:
Since it was rather rough on the edges, I decided to round it down and promptly broke it:Good grief. Since the rest of it was in one piece, I decided to use it temporarily as a holder while I worked on the pvc portion of the chuck. I inserted the pipe into the slot on the birch base and placed another piece of wood on top of the pvc pipe and placed the whole thing between centers to mark and drill it:The walls of the pipe will have slots cut into them and also a large hole-slot drilled and cut into it to allow the handle of the scoop to protrude while the piece is being turned. So I marked and drilled and cut into the sides of the pipe with a drill and a hack saw:The black lines are the cutting lines: And here is a photo of the completed chuck with the hose clamp in place:
 With that done, I removed the broken base and re-made it out of a piece of solid maple. Here is a photo of the completed chuck:
 I glued the pipe and the base together and they are drying in the shop.
Meanwhile, back at the ranch, I turned our red oak scoop blank down more:
 Hmmm...now it looks like a small lemon on a stick and the reason it does is that the x, y, z axis of the piece are not equal in length, or in other words, it isnt round yet. So back to the lathe we go for more turning, sanding and finally I cut it off:
 ...too soon. Its too large to fit into the pipe. So Im going to manually cut down the ends of the blank until it fits. Oh well, its a nice morning to work outside.
Now it fits, very tightly, but it fits:
 When this is placed back on the lathe in a couple of hours, I will shave off the top of the scoop and then hollow it out. If all goes well, I should wind up with a scoop with the handle attached. The glue really needs to dry hard so Ive removed the blank and Ive set it aside. Ill go back to it later this afternoon.
In the meantime, I finished the first walnut bowl. Here it is:
 And here is a side shot:
 Its been polished and its ready for delivery. Ill have to plug the holes in the base where the screws for the faceplate were drilled but that will only take a minute. Im going to go and email the happy owner.
Ill be doing another posting later today so stay tuned.
VW
Read More..


 I am going to stop cutting it and let the wood fibers settle down for a few days. Next week Ill place it back on the lathe and cut the sides and bottom a little bit thinner.
Its a nice day outside and I need to turn more darning eggs and tulips so I took some of my maple supply and cut it down into a cylinder and from there into a darning tulip:
 Im going to take a break and come back and cut the other tulip out. Then I have a hickory plate to re-cut...in other words, its gonna be a busy day.
Thanks for stopping by,
Vickie
Read More..
And here is a photo of the completed chuck with the hose clamp in place:With that done, I removed the broken base and re-made it out of a piece of solid maple. Here is a photo of the completed chuck:I glued the pipe and the base together and they are drying in the shop.Meanwhile, back at the ranch, I turned our red oak scoop blank down more:
Hmmm...now it looks like a small lemon on a stick and the reason it does is that the x, y, z axis of the piece are not equal in length, or in other words, it isnt round yet. So back to the lathe we go for more turning, sanding and finally I cut it off:...too soon. Its too large to fit into the pipe. So Im going to manually cut down the ends of the blank until it fits. Oh well, its a nice morning to work outside.Now it fits, very tightly, but it fits:
When this is placed back on the lathe in a couple of hours, I will shave off the top of the scoop and then hollow it out. If all goes well, I should wind up with a scoop with the handle attached. The glue really needs to dry hard so Ive removed the blank and Ive set it aside. Ill go back to it later this afternoon.In the meantime, I finished the first walnut bowl. Here it is:
And here is a side shot:Its been polished and its ready for delivery. Ill have to plug the holes in the base where the screws for the faceplate were drilled but that will only take a minute. Im going to go and email the happy owner.Ill be doing another posting later today so stay tuned.
VW
MID CENTURY CONSOLE white and walnut finish
Minggu, 17 April 2016
BEFORE AFTER
This was once my TV console but now I have cleaned her up ready for a new home.
She has a single sliding door and a mirrored back on the left side.
I taped off the very bottom of the legs where the metal feet are and painted them white.

The wood has all been dark waxed and polished. 

The handles were scrubbed clean and painted white.
This White & Walnut Mid Century Sideboard / Console is listed on the SHOWROOM page
with price and dimensions.
Read More..
Rounding out the walnut bowl
Kamis, 31 Maret 2016
Hi,
The walnut bowl has a big problem: it has dried out nicely but it is no longer perfectly round. So yesterday I re-cut the exterior surface of the bowl to a round shape:
 That part went well. But the inside doesnt match up, in fact we now have two different shapes superimposed on one another. You can see the uneven thickness of the rim of the bowl:
 Solution: cut the interior of the bowl until it matches the outside. Here we go:


This took a lot of careful cutting but the interior and the exterior walls now match up. We have a bowl!The walnut bowl has a big problem: it has dried out nicely but it is no longer perfectly round. So yesterday I re-cut the exterior surface of the bowl to a round shape:
That part went well. But the inside doesnt match up, in fact we now have two different shapes superimposed on one another. You can see the uneven thickness of the rim of the bowl:Solution: cut the interior of the bowl until it matches the outside. Here we go:You can see the fresh cut surface beginning to match up with the exterior. The cone needs to be removed and the bottom of the bowl flattened and smoothed:
I am going to stop cutting it and let the wood fibers settle down for a few days. Next week Ill place it back on the lathe and cut the sides and bottom a little bit thinner.Its a nice day outside and I need to turn more darning eggs and tulips so I took some of my maple supply and cut it down into a cylinder and from there into a darning tulip:
Thanks for stopping by,
Vickie
The Walnut Bowl continued Fall Colors
Selasa, 15 Maret 2016
Hi Everyone,
Ive spent the weekend with a back owie and fighting off a cold so today Im probably going to take it easy so I can get back on my feet.
I did work on the walnut bowl a bit yesterday. Ive begun sanding it to get it ready for the finish:
 Walnut can be a devil to finish (cherry is another difficult customer) as scratches from turning show up like headlights on a car. They stand out quite readily and have to be sanded away and that can take quite a bit of time. I use sanding stars and a drill to get the scratches sanded out of the piece. I use an 80 grit and 100 grit stars to accomplish that. Then I use sanding sponges, which are sponges with sanding grit bonded to the surface, to finish the sanding. I go all the way to 400 grit and by then the piece Im working on will begin to look polished. And thats what I have planned for this particular piece. Ive also rounded the rim a bit to give it a more finished look and Ive thinned the sides and the bottom a little. I think this will look quite nice when Im done.
And fall colors have arrived! Its cooled off a bit and its getting cooler at night and everything, especially maple trees, are beginning to change. Heres a photo:
 And its raining too which is nice. I love cool weather and I also enjoy winter here but if we dont have a winter like last year, I wont be disappointed. In fact if it doesnt begin snowing until a week before Christmas, Ill be really happy!
And one last bit of new: my youngest son informed me that he wanted to make a bowl! I was overjoyed at that news to say the least. So we went down stairs and he made a small bowl out of some redwood. He did a really nice job too. Redwood is very soft and can tear to shreds if youre not careful, but he pulled it off really well. Ill send pictures when hes done with the finish. Well done!!
More later,
VW
Read More..
Ive spent the weekend with a back owie and fighting off a cold so today Im probably going to take it easy so I can get back on my feet.
I did work on the walnut bowl a bit yesterday. Ive begun sanding it to get it ready for the finish:
Walnut can be a devil to finish (cherry is another difficult customer) as scratches from turning show up like headlights on a car. They stand out quite readily and have to be sanded away and that can take quite a bit of time. I use sanding stars and a drill to get the scratches sanded out of the piece. I use an 80 grit and 100 grit stars to accomplish that. Then I use sanding sponges, which are sponges with sanding grit bonded to the surface, to finish the sanding. I go all the way to 400 grit and by then the piece Im working on will begin to look polished. And thats what I have planned for this particular piece. Ive also rounded the rim a bit to give it a more finished look and Ive thinned the sides and the bottom a little. I think this will look quite nice when Im done.And fall colors have arrived! Its cooled off a bit and its getting cooler at night and everything, especially maple trees, are beginning to change. Heres a photo:
And its raining too which is nice. I love cool weather and I also enjoy winter here but if we dont have a winter like last year, I wont be disappointed. In fact if it doesnt begin snowing until a week before Christmas, Ill be really happy!And one last bit of new: my youngest son informed me that he wanted to make a bowl! I was overjoyed at that news to say the least. So we went down stairs and he made a small bowl out of some redwood. He did a really nice job too. Redwood is very soft and can tear to shreds if youre not careful, but he pulled it off really well. Ill send pictures when hes done with the finish. Well done!!
More later,
VW
The Walnut Bowl continued
Minggu, 06 Maret 2016
Today has been a very busy day and amongst all the stuff on my to do list, I needed to take a look at the walnut bowl blanks that I turned earlier this summer. The older of the two blanks felt much lighter than the last time I looked at it, indicating that it had dried out quite a bit so I took it out to the garage and decided to mount it on a faceplate and turn it.
Here is a photo of the blank with the turning foot still attached. I removed it with a hammer and chisel and attached the faceplate to it.

 I turned on the lathe and proceeded to smooth off the out side of the bowl and turn it round again:
 The outside is cleaning up very well and the wood feels dry to the touch. Next Ill have to level off the rim of the bowl and then turn the inside of the bowl round and that is going to be a big challenge. Ill be working on this over the weekend and Ill keep you updated.
Stay tuned,
VW
Read More..
Here is a photo of the blank with the turning foot still attached. I removed it with a hammer and chisel and attached the faceplate to it.
I turned on the lathe and proceeded to smooth off the out side of the bowl and turn it round again:The outside is cleaning up very well and the wood feels dry to the touch. Next Ill have to level off the rim of the bowl and then turn the inside of the bowl round and that is going to be a big challenge. Ill be working on this over the weekend and Ill keep you updated.Stay tuned,
VW
The Walnut Bowl finished
Kamis, 04 Februari 2016
Hi All,
Well, it took forever but I finally got the walnut bowl sanded and a coat of finish applied. Here it is:
 It looks great and I think it will come out really nice. Ill post final pictures.
Tomorrow Im going to prep the cherry bowl and get it ready for turning.
See ya tomorrow,
VW
Read More..
Well, it took forever but I finally got the walnut bowl sanded and a coat of finish applied. Here it is:
It looks great and I think it will come out really nice. Ill post final pictures.Tomorrow Im going to prep the cherry bowl and get it ready for turning.
See ya tomorrow,
VW
The Walnut Bowl
Selasa, 02 Februari 2016
Hi Everyone,
Well when I came home today, I had a serious case of wood turning fever and I had to get outside and work on the walnut bowl I started last week. So thats exactly what I did. I smoothed the underside and cut a very shallow foot:

 Wow, check out that grain. Isnt that lovely?
I decided since the grain pattern is so lovely not to add any adornment to the surface of the bowl. The wood speaks for itself.
Having decided that, I flipped it over and began hollowing it out. Here is a photo of the lathe spinning and Ive cut out the edge of the rim:

Well when I came home today, I had a serious case of wood turning fever and I had to get outside and work on the walnut bowl I started last week. So thats exactly what I did. I smoothed the underside and cut a very shallow foot:
Wow, check out that grain. Isnt that lovely?I decided since the grain pattern is so lovely not to add any adornment to the surface of the bowl. The wood speaks for itself.
Having decided that, I flipped it over and began hollowing it out. Here is a photo of the lathe spinning and Ive cut out the edge of the rim:
Here we are several minutes into hollowing it out: And here we are about 15 minutes after the above photo:
 Now the question arises: How deep should the bowl be cut? This blank was originally about 2 1/2 inches thick so we cant cut forever but it does need to be a little deeper. But how much deeper?
 I cut it about 1/4 inches deeper and decided to stop. Here is another photo:
 Ive taken it off the lathe and brought it upstairs and Im just going to contemplate it for the next day or so.
What do you think? Should it be a little deeper or should I play it safe and leave it as is?
Let me know what you think.
More tomorrow,
VW
Read More..
And here we are about 15 minutes after the above photo:Now the question arises: How deep should the bowl be cut? This blank was originally about 2 1/2 inches thick so we cant cut forever but it does need to be a little deeper. But how much deeper?I cut it about 1/4 inches deeper and decided to stop. Here is another photo:Ive taken it off the lathe and brought it upstairs and Im just going to contemplate it for the next day or so.What do you think? Should it be a little deeper or should I play it safe and leave it as is?
Let me know what you think.
More tomorrow,
VW
Langganan:
Postingan (Atom)