LEARNING HOW TO WAX white tall dresser

Minggu, 31 Januari 2016


Our last workshop was another fun day with lots of projects, questions, answers,
and Georges catered lunch.
 
 
We had a wonderfully sunny hot day and by the late
afternoon it was time to grab a bottle of water, pull up a chair, and a paint brush
to put some theory to the test.
 
We painted this antique oak mirror with ASCP Duck Egg blue and used some dark wax
to age and accent around the carved applique.
 
 
We started the day with drawer repairs, filling holes, and learning the ins and outs of
the paint sprayer. Then I let my ladies loose on a couple of my newly painted white chairs to
learn how to distress and be comfortable with it.
 
 
We also went through the steps needed to wax the textured surface of the chair backs
and how to get this silky soft and shiny smooth finish
using minwax natural furniture wax on this chest of drawers below.
 
 
I always lay out many projects at different stages for each of my workshops
and we generally only get to work with each for a short period of time,
leaving me with many things to sort out later.
 
 
The chairs are finished and now so is the dresser.
 
 
I reupholstered all the chair seats with new foam and a neutral fabric.
These are some comfy seats now!
 
 
Light distressing brought out the marvelous details on the dresser during waxing.
 
.
 
So the drawers are beautiful inside and out with all the decorative bits
and the eclectic mix of vintage french provincial handles.
 
 
Read More..

The Drinking Bowl Turning the bowl pt 2

Hi Everyone,
Well, I went down to the work shop and took a long look at the bowl and did a little measuring as well and it turned out that there wasnt a lot of wood left between the ends of the screw holes and the bottom of the inside of the bowl. So I turned the bottom more convex a couple of millimeters. This deepened the bowl, improved the appearance, and added a little more volume. Heres what it looked like immediately afterwards:
And I decided to stop there. Its not worth the risk of cutting into the screws and ruining the bowl. I sanded and oiled it and here it is at present:
Im going to oil over the next several days and give it a beeswax finish at the end and polish it. Ill post more photos when its done.
VW
Read More..

4RuQF8c"

retro,mod,style,decorating,ideas,mid,century,mod,style,decorating,ideas,modern,retro
Read More..

Working on my shop!

I have been putting in alot of effort improving my shop lately. I bought a shop vac that was on sale (50% off so it was $40) and cleaned up alot of sawdust that had been sitting in my woodworking shop for over a year.
I have been looking alot lately at power tools and shop equipment. I have decided to go ahead and start investing in some high quality tools that will serve me for a long time. I want some nice woodworking tools and I figure if I am going to buy some I may as well by some high quality stuff.
My first big purchase will probably be a hybrid or cabinet style table saw. I need a good table saw because the one I have now is my stepfathers and it was probably $120 dollars or something like that. It is a good saw but just not up to the amount of work I want to thow at it.
I am also looking at buying the Festool plunge saw kit with the guide rail for cutting plywood and the like. It is $500 but every review that I read, the people say that it was probably their best investment. Sounds like a good tool for me!
Read More..

Got some deals on some woodworking supplies!

Firday, my mother and I decided to go to a local salvage house to do some bargain shopping. The place we went to is a large freight companies "scratch and dent" store (AAA Cooper). While there was plenty of interesting things in there I only saw two things that I might could use in my shop.
One was a large roll of heavy duty paper that would be perfect to go on the side of my workbench so that I could stretch a sheet of paper across it when I want to paint or finish something, or just draw something really big. It was only $5 so I picked up a roll that should last a long time. I also grabbed a box of 100 latex gloves for one or two dollars that would come in handy some time or another.
When we were leaving the salvage house I recieved a call from a friend that was at an estate sale where there were alot of woodworking tools for cheap. I decided to ride over and I found some good tools for a good value.
-2 24" clamps $3 each
-2 2 1/2" C clamps $.50 each
-1 heavy duty square $2
I knew I could definately use some more clamps and every square that I have is a little bit out of square, even brand new ones! This one tested to be right on the money. I think from now on I will test every square before I buy it in the store.
Read More..

TIS THE WEEK BEFORE CHRISTMAS holiday decorating


Twas the night before Christmas, when all through the houseNot a creature was stirring, not even a mouse.
The stockings were hung by the chimney with care,
In hopes that St Nicholas soon would be there.
 
The children were nestled all snug in their beds,
While visions of sugar-plums danced in their heads.
And mamma in her ‘kerchief, and I in my cap,
Had just settled our brains for a long winter’s nap.
When out on the lawn there arose such a clatter,
I sprang from the bed to see what was the matter.
Away to the window I flew like a flash,
Tore open the shutters and threw up the sash.
 
The moon on the breast of the new-fallen snow
Gave the lustre of mid-day to objects below.
When, what to my wondering eyes should appear,
But a miniature sleigh, and eight tiny reindeer.
 
With a little old driver, so lively and quick,
I knew in a moment it must be St Nick.
More rapid than eagles his coursers they came,
And he whistled, and shouted, and called them by name!
 
"Now Dasher! now, Dancer! now, Prancer and Vixen!
On, Comet! On, Cupid! on, on Donner and Blitzen!
To the top of the porch! to the top of the wall!
Now dash away! Dash away! Dash away all!"
 
As dry leaves that before the wild hurricane fly,
When they meet with an obstacle, mount to the sky.
So up to the house-top the coursers they flew,
With the sleigh full of Toys, and St Nicholas too.
 
 
And then, in a twinkling, I heard on the roof
The prancing and pawing of each little hoof.
As I drew in my head, and was turning around,
Down the chimney St Nicholas came with a bound.
 
He was dressed all in fur, from his head to his foot,
And his clothes were all tarnished with ashes and soot.
A bundle of Toys he had flung on his back,
And he looked like a peddler, just opening his pack.
 
His eyes-how they twinkled! his dimples how merry!
His cheeks were like roses, his nose like a cherry!
His droll little mouth was drawn up like a bow,
And the beard of his chin was as white as the snow.
 
The stump of a pipe he held tight in his teeth,
And the smoke it encircled his head like a wreath.
He had a broad face and a little round belly,
That shook when he laughed, like a bowlful of jelly!
 
He was chubby and plump, a right jolly old elf,
And I laughed when I saw him, in spite of myself!
A wink of his eye and a twist of his head,
Soon gave me to know I had nothing to dread.
 
He spoke not a word, but went straight to his work,
And filled all the stockings, then turned with a jerk.
And laying his finger aside of his nose,
And giving a nod, up the chimney he rose!
 
He sprang to his sleigh, to his team gave a whistle,
And away they all flew like the down of a thistle.
But I heard him exclaim, ‘ere he drove out of sight,
"Happy Christmas to all, and to all a good-night!"
 
 
*Decorating Tip*
 
hang bells from the bottom of your Christmas tree to alert you
when kitty cats, puppies dogs, and children get snooping too close to the tree.
 
Read More..

A FANCY STORAGE BENCH

Sabtu, 30 Januari 2016


I only got so far with this bench before I had to put it on hold. The tea house fabric I wanted was out
 of stock and would take 4 - 6 weeks before I could get my hands on. It is an extra heavy upholstery
 fabric and looks so good with white distressed furniture. Well it finally arrived and the bench got
finished. The drawer fronts are all decorative but there is a hinged lid with tons of open storage
 inside. It is Canadian made in Quebec and comes with a key and lock. 
  
 
This bench was painted with ASCP Pure white and Old white. The original finished had a heavy
graining and I took advantage of it with the distressing. I used a 220 grit sand paper and made sure
to also sand all the edges.


Hope this inspires you!


Read More..

ROYAL CREST CABINET

 
Half way through this painting project I got a vision of a magical lion & unicorn crest
spread across the face of my cabinet. 
 
 
The cabinet I was working with was originally a lumber store pine kit project. It didnt get assembled
right and looked so bad that the thrift store I purchase it from had labeled it as *HOME MADE*
 
I rebuilt it from the bottom up, using new screws, new handles, new hinges, and a few well placed
 "L" brackets. She ended up getting a rustic paint finish and embellished across the front with a
 wonderful transfer.
 
 
 The top is painted with ASCP Graphite and the body was painted ASCP Old White. It turned out wonderful but hard to photograph so you can see how amazing it looks in person. I used the dark wax
all over the body to add age and depth to the finish.


As long as you understand how the 2 waxes work together you can create all sorts of finishes.


Read More..

Homemade Cornhole Boards

Just today, I finished building my third set of cornhole boards. The first two sets that I built were for myself and the third set is for a freind who is also addicted to cornhole on Friday and Saturday nights.
The boards are made of 5/8" plwood trimmed in 3/4" select pine grade boards with 3/4" oak legs. I used pockethole-joinery to join the pine to the plywood and screws to attach the hinges and the legs. Glue was used on all joints.
The first two sets of cornhole boards I made where not as good of quality as these boards are. I used 3/4" plywood and 3/4" pine for the first set but I didnt join the pine to the plywood flush with the top like I did with these boards, that should make the edges of the board more durable and it looks great also. Also I just screwed the top down into the pine framing leaving the screws exposed in the top of the boards. On my first set I used a simular hinge setup for the legs which never gave me any trouble.
On the second set I build I used some scrap pine 1x12s that I had laying around and I biscuited them together since I had just purchased my first biscuit jointer. This worked fine but I was learning the biscuits and my joints werent perfectly flush. For the legs I bolted through the 1x4 pine framing, that again wasnt mounted flush with the top of the board, and into the legs that pivoted on the bolt. This method was agrivating because you would have to tighten the wingnut on the legs very tight to make them stay put during gameplay (even then they would close up little by little with each through of a cornhole bag.
So I think I finally did it right this time joining the pine framing flush with the top of the plywood board and hiding all my joinery with pockethole screws. Using oak for the legs should be an improvement also. I really like the hinges and they are good heavy duty ones too. The legs dont slowly fold in on you like the bolted legs because the angle at which they sit is close to 45 degrees.
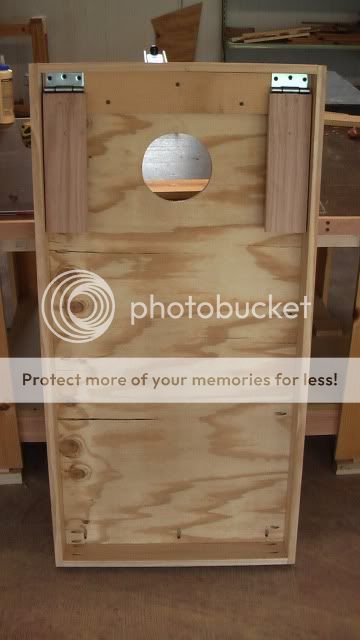
These are some great boards, I will have to build a set like these for myself! I think I will take photos or maybe video the building process to post on the internet too.
Read More..

Honey Locust continued

You know just when you think Mother Nature couldnt get any more spectacular, I come across a bowl blank like this. Even rough turned its a real beauty:
The photos dont really do justice here...
More tomorrow,
VW
Read More..

How To Build Frameless Base Cabinets

Free Frameless European style base cabinet plans that you can build for your kitchen, bathroom, office, home theater or other renovations. This is more than just how to build a base cabinet. Its practically everything you need to know about building frameless base cabinets before you begin. 
When I first tried to learn how to build cabinets I had a hard time finding all the information I needed. There was a little bit here, a little bit there, but nowhere did I find all the information all in one place. I did my best to combine most of what you need to know in one place to make things easier for you. Its a bit of a long read but if youre serious about building your own cabinets it to save money its well worth the time. One book I commonly saw mentioned was Build Your Own Kitchen Cabinets (Popular Woodworking) by Danny Proulx
In this article were going to focus on how to build a frameless base cabinet carcass. The cabinet carcass is the main box of the cabinet which does not include doors, drawer fronts or drawer boxes. The cabinet carcass can be configured in a number of different ways to allow doors, drawers, open shelving or any combination which suits your needs.
The frameless cabinet design I find easiest to build, install and provides exceptional strength is the one pictured right. It is made of 3/4" plywood throughout, including a full back. The top consists of 2 4" stretchers. Up to a 30" wide standard base cabinet carcass can be constructed out of a single sheet of 4 x 8 plywood.
This is the design well focus on but Ill address some other options and aspects.

Cabinet Base Options

There are 4 different ways you can configure the base of your lower frameless cabinet. Each one has its pros and cons.

Standard Base

The standard base has the sides and back of the cabinet extend all the way down to the floor and is notched in the front to provide a toe kick. The notch is 3" deep and 4-1/2" tall. There is a "sub toe kick" that provides additional support for the bottom and makes it easy to apply your finished toe kick cover (such as a decorative baseboard) over a continual stretch of cabinets for a seamless look.
This type of base is marginally more difficult to build and uses a little more plywood but you get a single cabinet unit which has advantages. Each cabinet needs to be shimmed individually to make it level. This is what most semi-custom cabinets you buy look like.

Standard Base No Toe Kick

Sometimes you wont need a toe kick at all such as when youre building a built-in desk or library. This base has the same pros and cons as the standard base except it has no toe kick. Instead a decorative board, the same thickness of the doors, is applied over the base of all cabinets after installation for a seamless look.

Adjustable Cabinet Legs

You can even create toe kicks on the sides of cabinets where necessary such as the end of a cabinet run or a kitchen island.

Cabinet Back Options

You also have a few options on how you construct the back of the cabinet.

Full Back

You can choose to use a full back that is the same 3/4" plywood used for the rest of your cabinet. (Some people choose to use 1/2" but I find its easier to just use one thickness throughout.) This configuration will give you an enclosed cabinet with exceptional strength which is important when installing heavy stone countertops and supporting heavy countertop appliances. It can be a little more money but not much if you plan your cuts out well. Well be using the Full Back in the example in this article.

Nailer Back

Sometimes you dont care if a cabinet has a back or not, such as in garage storage cabinets. This option can save on material. Instead of having a full back you create 2 nailing strips out of 3/4" plywood for the top and bottom of the back so you have something to affix the cabinet to the wall with and to provide rigidity and strength to the cabinet.

1/4" Back With Nailers

In some cases youll want to have an enclosed back but you want to save some money. You can use nailers as in the previous option but also staple a 1/4" plywood back over the nailers to provide a finished look. This is cheaper than using a full back and provides a lighter cabinet. Many semi-custom cabinet manufacturers use this technique. It doesnt add as much strength as a full back but it does give you the look and feel of one. The 1/4" plywood is more prone to warping than the 3/4" plywood and may bow out over time.

What Youll Need

Tools

  • Table saw or circular saw and guide for making accurate and square cuts in plywood.
  • Combination square
  • Kreg Pocket Hole Jig
  • Kreg Shelf Pin Drilling Jig
Plywood comes in different apperance grades. A1 being the best. If you plan on painting your cabinets or dont care about the apperance (garage cabinets) you can use a lower appearance grade cabinet. If you must use MDF to save money make sure you glue your joints in addition to using the appropriate pocket screws . 

Step 1: Calculate Cabinet and Component Dimensions

Chances are you will want to build a different sized cabinet than what Im going to show in this example. In most cases youll want to build multiple cabinets of different sizes so lets go over how to calculate the dimensions of the different components that make up the carcass. 

Cabinet Height

The height of the cabinet will be determined by the application. For example the standard height for the top of a kitchen work surface is 36". If our countertop thickness will be 1-1/2" that means our cabinet needs to be 36" - 1-1/2" or 34-1/2" tall.
Cabinet Height = Desired Top Height - Top Thickness
Some common work type heights are:
  • Kitchen 36"
  • Bathroom Vanity 33" to 36"
  • Desk 30"

Cabinet Depth

The standard depth for kitchen cabinets is 24" which includes the door. This should work for most situations but you may want to check the specifications of your appliances (slide in range, dishwasher, etc) to see if they require a different size. 
For bathroom vanity cabinets the standard depth is 21". For desks and other custom cabinets you can choose whatever depth works best for you though most are 20-30" deep.

Cabinet Width

This one is easy. The cabinet width is determined by your design and your preferences.

Cabinet  Component Dimensions

In our example were going to be constructing a 30" W x 34-1/2" H x 24" D cabinet using 3/4" plywood. Well be making it with a standard base and a full back. In all the dimensions below the direction of the grain will follow the height.
*Note: if youre using thick edgebanding youll need to factor that in where appropriate. Most edgebanding is less than 1/32" thick which is pretty insignificant so I dont factor it in most of the time. As long as its used consistently and applied before assembly I consider it an acceptable margin of error. Wood expands and contracts. Not all human cuts are very accurate. Consistency is more important over precision and it makes calculating sizes and cutting components much easier.

Cabinet Side Dimensions

We will need two sides for the cabinet. The height of the side is simply the height of our cabinet minus an external base if using one. The width is the depth of the cabinet minus the thickness of the door.
Cabinet Side Height = Height of Cabinet - External Base (34-1/2" - 0 = 34-1/2")
Cabinet Side Width = Depth of Cabinet - Door Thickness (24" - 3/4" = 23-1/4")
Well need 2 34-1/2" x 23-1/4" sides for our cabinet.

Cabinet Bottom Dimensions

The height for the bottom of our cabinet will need to be the width of our cabinet minus twice the thickness of the sides. The width will be the depth of the cabinet mins the back depth minus the door thickness. (Be careful sometimes advertised size isnt true size. A digital caliper
Cabinet Bottom Height = Cabinet Width - 2 x Side Thickness (30" - 2 x 3/4" = 28-1/2")
Cabinet Bottom Width = Cabinet Depth - Back Thickness - Door Thickness (24" - 3/4" - 3/4" = 22-1/2")
Well need one back that is 28-1/2" x 22-1/2".

Cabinet Shelf Dimensions

If youre installing a shelf in your cabinet (as our example does) you want to size it appropriately. Its basically the same dimensions as the Bottom minus a little depth (1/2") so that it stays clear of the doors even if there is some expansion.
Cabinet Shelf Height = Cabinet Bottom Height (28-1/2")
Cabinet Shelf Width = Cabinet Bottom Width - 1/2" (22-1/2" - 1/2" = 22")

Cabinet Back Dimensions

We can use some of the previous dimensions we calculated to determine the dimensions of the back of the cabinet. The back of the cabinet will rarely be seen and even when it is it wont be lit very well. While its nice to have a consistent grain direction for the backs you might be able to save a sheet of plywood by mixing the grain direction up for the backs if you dont mind a little inconsistency in an inconspicuous location.
Cabinet Back Height = Cabinet Bottom Height (28-1/2")
Cabinet Back Width = Cabinet Side Height - Stretcher Thickness (34-1/2" - 3/4" = 33-3/4")
Our cabinet needs one back measuring 28-1/2" x 33-3/4".

Stretcher and Sub Toe Kick Dimensions

Grain direction should be along the long side but in most cases these components will hardly be seen so feel free to change the orientation if it helps you maximize the usage on your cut plan. 
Stretchers should be 3-4" wide, the sub toe kick should match the height of the notch cut into the base (4-1/2" in our example). The height of both should be the same as the Cabinet Back Height (28-1/2").
Well need 3 stretchers (4" x 28-1/2") and one sub toe kick (4-1/2" x 28-1/2")

Step 2: Attach Side To Back

Wow! Youve read all this way and were just starting to put the cabinet together! Careful planning makes the rest of the process easy.
Start by applying edgebanding to the front of both cabinet sides.
Drill pocket holes around the top and sides of the Cabinet Back and attach it to one of the sides as shown.
Notice that the bottom of the back is flush with the bottom of the side. There is a 3/4" space on the top of the back for the stretcher that will eventually be installed.

Step 3: Attach Bottom

Apply edgebanding to the front of the bottom, drill pocket screw holes as shown and attach the Bottom to the Side and Back previously assembled. Notice that the bottom of the Bottom is flush with the notch for the Toe Kick. Use your square to make sure everything is aligned properly.

Step 4: Attach Other Side

Attach the other side to the cabinet assembly using the previously drilled pocket holes in the Back and Bottom pieces.

Step 5: Attach Stretchers

Apply edgebanding to the front of the 2 stretchers that will be attached to the front. Drill pocket holes and attach to the cabinet making sure everything is square. The bottom stretcher on the front is for the first drawer. To minimize visibility of the pocket holes install them with the pocket holes facing up. (The drawer will hide the second front stretcher holes.)
In this example were assuming the cabinet will have a single full width drawer and 2 lower doors. The spacing for this bottom section will be determined by the desired drawer height. The standard top drawer height is 6". Were planning for overlay drawers and doors. A 1/4" gap should be on the top to avoid any binding against the counter top. That means the second front stretcher should be 6-1/4" down from the top of the cabinet.

Step 6: Install Sub Toe Kick

The Sub Toe Kick helps support the cabinet and add rigidity. It also makes it easy to nail in the finished kick board after installation. Drill pocket screw holes and attach it between the cabinet sides as shown.
Use the short side of the jig without the fence to get the holes 37mm from the front edge of the jig. When doing the back, flip the jig around.
When youre done, apply edgebanding to the front of the shelf, insert shelf pins in the appropriate locations and install your shelf.
To learn how to make drawers see my post on How To Make Drawer Boxes. 
Read More..
0 komentar
Postingan Lebih Baru Postingan Lama Beranda