

You hear the stories of ppl donating time or money to a good cause and the perception is they will get
it back two fold. Pay it forward is what we call it these days, and this is my story of paying it
forward and my perception of getting it back.

One day while out picking I came across a voucher in my wallet for money off at a popular clothing
store. I had forgotten all about it and it was due to expire that day!!! I didnt have the time to go
shopping for clothes so I did the next best thing. I found the store, waited a moment in the parking
lot until the next customer approached, handed it off to her, then I was off.


At my very next stop I found this beautiful French solid wood dresser. In these parts I cant afford to
buy a dresser like this to repaint and sell, they are just too expensive. Well this one was priced low
enough for me to get really excited about and for me to afford. So I paid the man and got it loaded in
the van. I didnt put 2 and 2 together about the free money I had just given away and the great deal I
had just found until later when I was happily painting away. It made me smile.
I worked very thoughtfully to achieve an amazing color combination for the finished piece, but
this photo shoot needed some very hard work. This piece was so big for my little showroom most of
the other furniture had to be moved out of the room. I stacked 4 tables in front of the bathtub, the
hallway had less than a foot for me to shimmy down one side when I had to get the camera, and the
front door couldnt be opened for the stack of furniture I piled there.
The color is ASCP Provence with a brown 4 layered color distressing on top.
UPDATE:
For those wanting to learn more about how to achieve this look:
http://blogspot.ca/2013/12/mixing-brown-paint-painting-hardware.html
*********************************
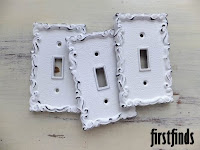
Stop in to see whats new in shabby chic white hardware available at firstfinds. 


Read More..
There are over 1000 pieces of used hardware to choose from
Etsy Shop.


 This is a sizable, heavy block of wood and so it is going to take some precautions to turn it safely. Im going to use big, long wood screws to hold it to the faceplate and Im also going to place it "between centers" which means Im going to use the live and dead centers of the lathe to mount it:
 Now it can be turned without a lot vibration and that means it can be turned safely.
 ...and here is the blank after about 15 minutes of turning. You can see that there are both sapwood and heartwood in this blank.
 The next posting will describe how the bowl is attached to the lathe and hollowed out.


 You can see the foot, the tenon, and the heat and sap wood areas of the blank.
 At this point the bowl is ready to flip over and hollow out. Moment of truth-once the bowl is flipped over and I begin hollowing it out, the bowl cant be flipped back if there is a problem. Here we go...
 In the above photo, Ive flipped it over and placed it between centers again. Until the bowl is substantially hollowed out, Ill turn it between centers. When its been hollowed, and its lighter in weight, Ill remove the dead center and the center post in the bowl.
 Above is the bowl after about an hours worth of turning. The sides are about 1 inch thick and Ive left the center post in the bowl. This will help keep the bowl in its round shape and keep it from cracking. Now Im going to cover it in paste wax and place it in a large box of wood shavings and let it dry for several weeks. In about three weeks time, Ill take it out and see hows its going so keep you fingers crossed that the bowl is ok and it dries well.


 Leather repair kits claim you can repair rips in leather yourself. These DIY leather repair kits are available at reasonable prices but do they work? Actually they do but there are some things you need to know before you jump in and try it. I bought a kit to try it out.The armchair of my leather sofa set has seen better days. Its location makes the leather armrest a popular spot for pets and people to sit on. Over the years cat scratches combined with the weight of people sitting on the armrest caused a number of rips and tears in the leather. I was about to call a professional leather repair expert to see what they could do but I decided it would be a good opportunity to test a leather repair kit to see if it actually works. Reviews I read were mixed so I was curious to see if I could do it myself.
 I used the provided plastic tool (which looks like just plastic plant labels) to push the backing fabric in place. I also used it to scoop out some of the repair compound to slide underneath the leather to glue it to the leather. Let it sit a few hours to dry.


