After the hustle and bustle of working with my Chair for Charity,
getting it to the photographer early, and Georges accident and ER visit,
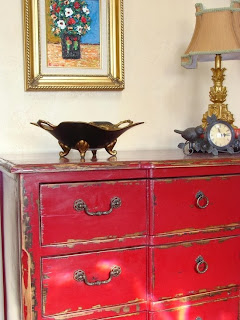
I have finally finished one of the dressers I previously started.

Isnt this color amazing, the knobs made me do it!
I have been wanting to show you how far Annie Sloan Chalk Paint can really go.

This little pot of ASCP in Emperors Silk (seen above)
covered this vintage 4 drawer dresser (shown below)
and I still have some left in the pot.

On average I can paint 4 pieces this size with a regular size can,
but it also depends on your original finish and what you want to achieve.

The original finish did lend its self to red so take that into consideration when choosing your color.
I did also paint the top but changed my mind and washed it off. 


This dresser is probably at least 100 years old. You should see the construction its amazing.
The story as we were told when we purchased it was
it spent many years through the middle of the 20 century
on Campobello Island on the east Coast of Canada.
The owners uncle was a Canadian senator with a vacation home there
and friends with Franklin Delano Roosevelt who often visited as the Roosevelts also
vacationed on Campobello.
Before I gave him his new color and a shiny top
I fixed all the issues that had arisen with age.
My full post about my charity chair is still coming
included with that will be some pretty pictures Glam It Up Photography took.
It does appear I spelt *AVAILABLE* wrong, but I love this picture.
Glam it Up Photography took my imperfections and made them look amazing.
Plz do not send me emails, my claim to fame is wood working not spelling,
and I recall I was yelling at my mischievous printer at the time I was writing it.
Its all the printers fault!
Read More..