Tampilkan postingan dengan label for. Tampilkan semua postingan

MIRRORS FOR MANTLES

Sabtu, 30 April 2016


A friend has been looking for a large decorative piece for her mantle
and we have discussed a few options ... to no avail.
 
 
Then she spotted this mirror sitting in a big pile of my treasured furniture and the idea was born.
Plz measure this .... its perfect! - Plz paint it ... perfectly white!
 
 
Of course it is not the only uber cool mirror I have hiding around here so I pulled out this one too
and fixed it up and painted it for some one else who might be in a similar situation.
Check out the ACCESSORIES page for this mirror and several other updates including
some over sized frames.
 
Read More..

CHAIRS FOR CHARITY

Selasa, 26 April 2016

 
So lets talk chairs! 
 
Calling all local bloggers,
and I especially mean ....
 
Jen of http://jentiques.blogspot.ca/
Kelley of http://theupholsterswife.blogspot.ca/
Claudine of http://condensedlovehome.blogspot.ca/
Colleen of http://vintagehomecolleen.blogspot.ca/
Kathryn of http://uglyducklingtransformations.wordpress.com/
Tobey of http://www.tobeystreasure.com/
 
reach into your bag of tricks and see what you can do to help
this event become a bigger success the second time around.
 
I know you all have a chair you can get your hands on and
make it over for this charity event.
 
 How about ....
 
 a repaired dining chair?
 
maybe a desk chair                                       a turquoise chair
 
a slipper chair
a country bench chair
a little vintage chenille chair                             black and white chair
 a little burlap                                           a numbered chair
 
 a toile chair                                                      jack chair
 
For those considering to attend this live auction to bid on your very own remade chair
this is the chair I won last year and George has been enjoying ever since.


Read More..

A Bookcase for my Mother

Senin, 25 April 2016

Well my mother wanted a new bookcase to go in her living room. She dreamed up a simple and a bit modern design that featured full overlay drawers and a smoothe clean look all around the piece.
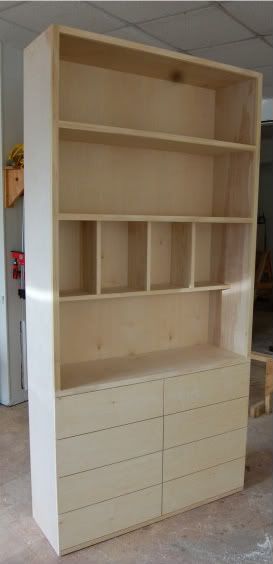
Pretty simple but nice. I used 3/4" and 1/2" birch plywood for the construction and some 3/4" poplar for the face frames. I bought some full extention drawer slides from a local wholesale supplier for about $13 a pair, talk about a deal. I was paying somewhere around $20-$25 a pair, Im glad I found these!
Anyways, I finished it will some red mahogany stain after I applied a bit of prestain right before. It was my first time using prestain and I think it may help a little bit, but not a really big difference. I then aplied 2 coats of high gloss poly to finish it off and seal the piece. I dont have a photo of that at the moment but I will try to get one up soon.
Read More..

2013 CHAIRS FOR CHARITY

Minggu, 17 April 2016

 
October has arrived and the month is going to be busy. It is time to move my projects indoors
and batten down the hatches so to speech. We already had 2 nights of heavy wind and rain this past weekend. Now is when I start to feel a bit claustrophobic having to stay indoors so much more.
One event this month that will get me out of the house is Chairs for Charity at The Passionate Home.
 
photo taken by Glam it up Photography
 
This event raises money for the Langley Christmas Bureau. The Union Jack Chair above was my
donation last year and it raised $250 at the live auction. 20 chairs are being revamped and donated
by local artists. New this year professional photographer Steve Hayek is photographing each chair
that is dropped off before Oct 10th. All you participating artists take advantage and get your chair in
 early just to get a fabulous photo of your work to show off.
 
This is my "BEFORE" picture for this year.
 
 
Ill share my finished chair with you when Steve gets it photographed.
No pressure Steve!! http://stevehayek.com/
 
Now to the details of the Event:
 
Date: Thursday, October 24, 2013
Where: The Passionate Home
20506 Fraser Hwy., Langley
When: 6:30pm - 8:30pm
Chairs are auctioned off both through a silent and live auction ... process. The top 10 chairs go on the live auction block at 7:15pm on
Thursday, October 24th. Guests will enjoy beverages and
treats from Frosting Cup Cakery.
**The remaining chairs are available through silent auction bids.
Bidding on these chairs opens on Tuesday, October 22nd at
1:00pm and closes on Thursday, October 24th at 7:00pm.
People are invited into The Passionate Home during store hours
on those days to place their silent auction bids.
 
**Also new this year is the silent auction bids run for 3 days starting on the Tuesday that week.
This will give more folks the opportunity to stop in and place a bid during the week.
Cant wait to see you all and the support from the community!
 
 
Read More..

DIY Closet Organizer Plans For 5 to 8 Closet

Kamis, 24 Maret 2016

Free woodworking plans to build a custom closet organizer for wide reach-in closets. Can be customized to suit your needs and budget.Over the years Ive been redoing many of the closets in my home. The closets previously contained a single rod and shelf which didnt provide efficient use of space. These plans were inspired by the ClosetMaid Selectives 25 in. White Custom Closet Organizer

What Youll Need

Materials

  • (2) 4 x 8 Sheet 3/4" hardwood veneer plywood (for organizer)
  • (2) 2 x 4 Sheet 1/2" hardwood veneer plywood (for drawer boxes)
  • (1) 2 x 4 Sheet 1/4" hardwood veneer plywood or tempered hardboard (for drawer bottoms)
  • (3) Blum 230M Epoxy Coated Slides 12" 3/4 Extension 100# Class Self Closing
  • (20) 3-1/2" Wood screws (to secure to studs)
  • (6) 1" pan head wood screws (to attach drawer front to drawer box)
  • Shelf Pins
  • (6) 23-3/4" x 15" 3/4" Plywood Shelves (7 if your closet is 6 wide or less)
  • (1) 72" x 15" 3/4" Plywood Top Shelf
  • (2) 18-3/4" x 15" 3/4" Plywood Shoe Rack Shelves
  • (2) 23-3/4" x 2-5/8" 3/4" Plywood Nailers
  • (1) 23-3/4" x 3-1/2" 3/4" Plywood Top Nailer
  • (5) 15" x 3-1/2" 3/4" Plywood Side Brackets
  • (1) 27-1/4" x 3-1/2" 3/4" Plywood Top Shelf Support (Left)
  • (1) 18" x 3-1/2" 3/4" Plywood Top Shelf Support (Right)
  • (1) 23-1/2" x 5-1/4" 3/4" Plywood Drawer 1 Front
  • (2) 23-1/2" x 10" 3/4" Plywood Drawer 2 Fronts
  • (2) 12-3/4" x 4" 1/2" Plywood Drawer Box 1 Sides
  • (2) 1 9-3/4" x 4" 1/2" Plywood Drawer Box 1 Front/Back
  • (4) 12-3/4" x 8-3/4" 1/2" Plywood Drawer Box 2 Sides
  • (4) 1 9-3/4" x 8-3/4" 1/2" Plywood Drawer Box 2 Front/Back
  • (3) 12-1/8" x 22-1/8" 1/4" Plywood Drawer Box Bottoms

Cut Plan

Depending on the size of your closet and any modifications to the plans you choose to make your cut plan may need to be different. . Cut the back shelf supports, top shelf and shoe shelves a little longer than necessary and trim them to size during installation.

3/4" Plywood

The main components of the closet organizer are constructed of 2 4 x 8 sheets of 3/4" plywood which will provide for a very strong closet system. 

1/2" Plywood

The 1/2" plywood is used to construct the drawer boxes. Youll need 2 2 x 4 Sheet. A good choice is PureBond 1/4" Maple Plywood

1/4" Plywood

For the drawer bottoms youll need 1 2 x 4 sheet of 1/4" plywood or tempered hardboard.

Finishing

You can choose to paint or stain/finish the plywood any way youd like. If youre painting use low VOC primers and paints and if youre staining/finishing use water based stains and finishes to prevent your clothes from smelling. Oil based paints, stains and finishes tend to out gas for a long period of time and being in a confined space like a closet will concentrate the smell which will be absorbed in your clothing.
After you cut out all the pieces paint or stain/finish the components before assembly. It will make the installation go a lot quicker. Before finishing read the entire plan to understand which edges should be edgebanded before finishing.

Why Install A Closet Organizer?

If you live in an older home, the closets may not be as big as youd like which means its important to get as much out of the space as possible. The single rod and shelf configuration that existed in my closets wasnt cutting it. One of my closets was 6 wide which meant I had 6 of rod space and 6 linear feet of shelf space. By installing a closet organizer I preserved my rod space but doubled my shelf space.  It makes it easier to find what Im looking for and helps keep my clothes from getting wrinkled when bunched close together.

Why Build When You can Buy?

There are many different closet organizers you can buy. The ClosetMaid Selectives Organizer Ive installed are pretty nice and not too expensive but you only get a basic closet organizer system. Adding accessories to  make it more useful starts to bring up the price tag. Building my own will save some money.
The ClosetMaid Selectives organizer is constructed of 5/8" melamine coated particle board and I have installed some 5/8" melamine coated Closet Maid shelves as well. In one closet I am storing some heavier items and even with a span of only 26" there is noticeable deflection (bending). Building a closet organizer out of 3/4" sheet goods will make it sturdier and using something like PureBond hardwood veneer plywood can result in a more attractive closet that is also formaldehyde free.
Of course being able to customize the closet organizer is also a very attractive reason for building one yourself.

What Type Of Plywood To use?

At a minimum I would recommend 5/8" thick sheet goods but 3/4" is preferred and usually easier to find. Hardwood veneered plywood is stronger and a more attractive option. Since most of the organizer will be covered with clothes you dont need to get the more expensive cabinet grade plywood. The domestic plywood available at Home Depot, such as PureBond is a good choice. If you like the scent of cedar on your clothes and the purported insect and mildew resisting properties you might want to consider making the organizer out of 3/4" aromatic cedar plywood if you can find it. 3/4" MDF (medium density fiberboard) is a little cheaper if you plan on painting it. Melamine coated particle board is also affordable and you dont have to worry about finishing the panels. Some people like the melamine coating because its easy to keep clean and saves some time by not having to worry about painting or finishing. Particle board isnt as strong and durable as MDF or better yet plywood. In the end you should get what your taste and budget allows for.

Step 1

Edgebanding should be applied to the front edge of both Side pieces and the bottom of the top Nailer. You can edgeband the bottom of the other two nailers if youd like but chances are youll never see those edges.
Having already cut and finished the plywood components its time to start assembling the closet organizer cabinet. Lay one of the Side pieces on a flat work surface and attach the 3 nailers as shown using pocket holes and screws. The 3.5" nailer gets install flush with the top of the Side panel. The 2 2-5/8" nailers get installed at 14-3/4" and 41-1/4" from the bottom.
The nailers provide support to the cabinet as well as a structure to secure it to the wall.
Youll notice that a small notch is cut at the back/bottom of the side panel. This is to accommodate for the baseboard installed in the closet so that the organizer can sit flush against the back wall. The measurements for this cut will depend on the size of your baseboards. You dont have to be very precise and scribe the exact profile as this part will be hard to see.

Step 2

Install the 2 Fixed Shelves. The fronts of the shelves should be edgebanded before finishing. These shelves help give the organizer strength. They are installed on top of the 2 thin nailers that were installed in the previous step. Use pocket holes and screws to secure the Fixed Shelves to the organizer Side piece.

Step 3

Now attach the other Side piece securing it to the Nailers and Fixed Shelves using pocket holes and screws.

Step 4

With the main cabinet frame of the closet organizer assembled you can begin to start installing your closet organizer. 
Position the organizer in your closet where youd like it depending on how much double and single rod area you prefer. This organizer doesnt work that well with sliding closet doors because most people will want to install this close to the center which will be blocked by the doors. Installing bi-fold closet doors will give you more access into your closet but you might also be able to get away with installing the organizer more towards one side if you dont need a lot of long hanging area for example.
Once you have the organizer positioned where youd like make sure its level and secure it to the wall by driving 3-1/2" wood screws through the nailers into the wall studs. 

Step 5

The side brackets help support the shelves and provide a secure surface to attach the closet rods.
Attach the Side Brackets that support the closet rods and shelves to the side walls. The plan calls for these brackets to be 15" long. Before you cut them out check the stud locations on your walls to see if you might need to make them a little longer to be able to screw them securely into 2 studs.
All the supports except one should be edge banded on the front and bottom. One of the supports which gets installed on the lower rod area of the double rod section (left in picture) should be edgebanded on three sides, top, bottom and front before finishing.
The back of the supports should be up against the back wall of the closet. On the double rod side two supports are installed at 42" and 84" above the floor. On the single rod side three nailers are installed. One for the closet rod at 84" above the floor and two at 7" and 14-3/4" above the floor for the shoe rack.
Make sure the supports are level and secure them into the studs using 3-1/2" wood screws.

Step 6

The Top Shelf Supports only need to be edgebanded along the bottom edge.
You should have cut these out a few inches longer than your plan had called for. Measure and trim them to size and screw them into the studs on the back wall using 3-1/2" wood screws making sure theyre level.
On the cabinet side the flange should be installed so the top-center of the rod is 12" away from the back wall and 82-1/2" above the floor for the top rods and 40-1/2" above the floor for the lower rod. If everything else was installed accurately and level the rod should also be level but double check for level before screwing into the cabinet.
Once your closet rods are installed your organizer should look like this.

Step 9

Drawers add convenience and a nicer appearance to the closet organizer but you can save a significant amount of money by omitting them and just installing more shelves. The cut plan accounts for extra shelves. One of the things I didnt like about the ClosetMaid Selectives closet organizer kit I purchased was that it didnt have a lot of shelves and necessitated purchasing either more shelves or drawers to make up for it which added to the cost.
If you choose to omit the drawers youll save money by not having to buy the additional 1/2" and 1/4" plywood for the drawer box construction as well as the drawer slides and drawer pulls.  Instead you can add shelf pin holes and 2 adjustable shelves for added shoe storage.
One of the biggest cost benefits however comes from building your own drawers. For what it costs to buy just one of ClosetMaids drawer kits you can build all three drawers for our DIY closet organizer.
There are 3 drawers in the plan. One 5-1/4" and two 10" drawers that get installed in the lower section of the closet organizer. You can choose any drawer pulls youd like.
The drawer fronts should be edgebanded on all 4 sides.
Three drawer boxes are needed based on the design and drawer slides selected:
  • (1) 4" H x 1 10-3/4" W x 12-3/4" D
  • (2) 8-3/4" H x 1 10-3/4" W x 12-3/4" D
For instructions on construction please see my article on how to build drawer boxes.
Once the drawers are installed this is what your finished organizer should look like.
Read More..

Starting some Adirondack Chairs for a wedding gift

Jumat, 18 Maret 2016

My sister is getting married in one month and I have decided to build a pair of Adirondack chairs to give to her and her fiance. I have never built any before but they look easy enough, cant be to hard!
I hear of people building and selling the Adirondack chairs. I wouldnt mind selling a few if I could make a decent profit on them but I will have to find somewhere to sell them. This weekend my girlfriend and I went to the local flea market and there were some nice Adirondack chairs there that were selling for $75 for the most basic single design. They were all completely unfinished and would need some sort of finishing before they could be sat outside in the weather.
Sounds like if I primed and painted them I could sell them for at least $150 each. It doesnt take alot of materials to build one and shouldnt take to much time, especially when you could get a system going and good pattern.
We will see.....
Read More..