Tampilkan postingan dengan label from. Tampilkan semua postingan

BENCH BUILT FROM A BED

Jumat, 29 April 2016


I spend a great deal of time and labour rebuilding fun and useful furniture from salvaged items
and sometimes the items wouldnt be possible without first being donated for a new purpose.


This amazing red bench originally was a donated headboard and footboard
from Carrie Thachuk owner of The Passionate Home.


It was a dark stained solid oak mission style bed her daughter had used at one time.
With the addition of some more salvaged wood, and several hours of painting and waxing
she is now the perfect entry / hall bench or dining bench as the back side is also finished.
 
I used:
2 seat boards & 4 cross struts for the ends 
base coat ASCP white, 2nd coat flat black spray paint, top color ASCP Emperors Silk
sanded with 120 grit, waxed and polished with Minwax paste finishing wax
 
 
The Passionate Home is about to celebrate their 7th year with a Birthday Flea Market right inside the store.
FYI, I stopped in for some paint yesterday and saw the amazing treasures being brought out.
This is one sale you do not want to miss,
I started making all sorts of funny noises with each different item I saw the chance to own.
 
Lots of ornate frames, a tall set of lockers, fancy glass wear, candle holders, orchard baskets, cheese box, wash stand cabinet, french provincial dining set with hutch, vintage baking pans, suit cases, local vintage life preserver, old typewriter and table, dental table, iron stone, 2 large vintage gates / doors, shutters, half a dozen shoe stretchers, beautiful china, science beakers, dress mannequin, lamps, antique brass candle sconces, Victorian oil lamps, DIY chairs, guilded mirrors, mason jar, misc silver trays and kitchen wares, tool caddies, antique irons, and more.
 
Congratulations Miss Carrie, not very many small business owners gets to celebrate 7 years.


Read More..

More Friday notes from the wood shop

Jumat, 18 Maret 2016

Well, I went back down to the wood after lunch to take a look at the beech bowl and the honey locust tea box. The beech bowl had really distorted quite a bit and I decided against my better judgement to try and re turn it round again, which predictable results:
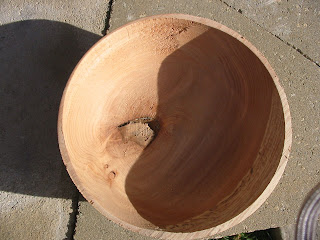
It doesnt have enough thickness left in the walls to true it up so this one will have to be tossed.
But the honey locust box is coming out well. Its very rough from drying but it managed to keep its shape. Here are photos of the side and the interior:
This is really going to be pretty when its finished. Im going to need to make a lid for it, the question being what kind of wood to use? It think a yellow, vanilla colored wood would really look great on the box and the type of wood that comes to mind is clear pine. It has a similar grain pattern and a wonderful vanilla yellow color so Im going to take some pine I have in the shop and make a top and see what it look like. If it doesnt work out, then well get a hold of some hickory and try that.
I decided just for the heck of it to take a look at the sycamore bowl:
As you can see its really distorted and it has two cracks in it.
Sometimes theres a lot to be said for kiln-dried lumber. People criticize it as being boring and its true that the wild grain patterns and lovely colors are usually missing from kiln dried lumber. But its is dried out and it doesnt distort after its been cut.  Sometimes working with green unseasoned wood is a lot like having a drama queen in the wood shop. You just never know what they are going to do.
So well be using kiln dried lumber for the tea boxes so come on back and see how this works out.
...sigh...
More later,
VW
Read More..

Computer Desk From 1 Sheet of Plywood

Senin, 15 Februari 2016

This attractive and functional computer desk is built using only one sheet of plywood and 14 cuts which makes it an easy and affordable desk that can be built with a few tools.
You can stain and finish it to reveal the the natural wood grain, paint it any color youd like or mix painting and staining as in the black and maple desk example shown right.
The desk provides ample space for your computer and accessories as well as storage space for books, paper and other items youll want to have handy while working on your computer. All this from just a single sheet of plywood!

Dimensions

48"W x 33 1/2"H x 23 15/16"D

What Youll Need

Materials

  • (1) 4 x 8 Sheet of 3/4" Plywood (or 4 sheets of 2 x 4 3/4" Plywood)
  • (50) of Preglued Veneer Edgebanding
  • (4) T-Nut Cabinet/Furniture Levelers
  • (6) 1/2" flat head wood screws
  • (6) 1/4" Shelf Pins
  • Wood Glue
  • 220 and 120 grit sandpaper
  • Painting and/or finishing supplies

Tools

  • Kreg Pocket Hole Jig
  • Drill
  • Circular Saw with Guide, Track Saw or Table Saw for cutting plywood.
  • Miter box or power miter saw
  • Kreg KHC-90DCC 90-degree Corner Clamp
  • (2) 26-1/8" x 23-15/16" Sides (24" x 26-1/4")
  • (1) 46-1/2" x 12" Apron (46-1/2" x 12-1/4")
  • (2) 46-1/2" x 1-11/16" Front (46-1/2" x 1-1/2")
  • (1) 48" x 10" Shelf
  • (1) 21-5/8" x 12" Storage Side
  • (2) 21-5/8" x 11-7/8" Storage Bottom and Storage Shelf
  • (2)10" x 5-7/8" Shelf Sides (10" x 5-15/16")
  • (1) 10" x 11-7/8" Paper Tray (11.5" x 10")
  • (4) 1-3/8" x 5-7/8" Paper Tray Supports (2 will be 7/8" x 5-7/8")

Cut Plan

You can either cut the desk out of one full 4 x 8 sheet of plywood or 4 2 x 4 quarter sheets of plywood. If youre using quarter sheets Id recommend the formaldehyde free PureBond 3/4 in. x 2 ft. x 4 ft. Maple Plywood which can be shipped directly to your home from HomeDepot.com and is eligible for free shipping.
For either full or quarter sheets the cut plans assume a maximum kerf (cut width) of 1/8" so its important to use a thin kerf saw blade. The Freud Ultimate Plywood Saw Blade is a good choice for a thin kerf blade that will minimize tearout and splintering when cutting plywood.

Full Sheet

If using a full sheet of plywood, break down the sheet into three smaller sections by making the 2 cross cuts highlighted in red. First make the 48" cut, followed by the 26-1/8" cut. You can also break down the three sections further. The 48" and 26-1/8" section can be cut exactly in half (23-15/16 accounting for the 1/8" kerf) but the last section is not exactly in half (24")

Quarter Sheet

You save a little bit of money by buying one full sheet but it might be more convenient to purchase 4 quarter sheets instead. The smaller sheets are easier to transport and you can even have them delivered to you for free. If youre picking up the plywood you could have the store make some convenience cuts for you but the quality and accuracy of the cuts will depend greatly on the condition of the blade and how good the person operating the panel saw is at making accurate cuts. These convenience cuts are not guaranteed to be accurate.

General Instructions

Its important to know how to use all your tools and follow all the safety recommendations. This project consists of simple cuts but its important to make sure to measure and cut each piece carefully. Square cuts in the plywood will make for a stronger desk. Its not necessary to glue the desk together as the pocket screws will provide sufficient strength and allow you to disassemble the desk at a later point if necessary. You will need to cut and assemble the desk first, then it is highly recommended to break it down again for finishing.

Step 1

Cut out the Desk Top, Sides, Storage Side, Storage Shelf, Storage Bottom, Apron and Front. Apply veneer edgebanding to all edges of the Desk Top, the 2 long edges of each Side and the front edges of the Storage Shelf, Bottom and Side.
Decide which side youd like the storage to be on, the left or right, then choose that Side piece and the Storage side and drill a series of holes part way into the insides of the plywood for the shelf pins using either a piece of peg board or a shelf pin jig.

Step 2

Arrange the desk top and legs on the floor with the good faces facing out. Drill 5 pocket holes on the inside tops of each leg. The first hole towards the front should be about 1" in while the one towards the back should be about 1/2" in to accommodate the front strip and modesty panel (apron).
Align and secure each leg to the bottom of the desk top using 1-1/4" pocket hole screws. Make sure the sides are attached square to the top. Using the right angle clamp helps a lot.

Step 3

Attach the front strip flush to the front of the desk using 4 pocket holes with 1-1/4" screws on the back to attach to the sides and 3 3/4" corner braces with 1/2" flat head wood screws to attach to the top as shown below.

Step 4

Drill holes for pocket screws in the Storage Side and Apron (modesty panel) as shown. There is also a pocket hole going from the inside of the Storage Side into the Front which is not visible. First attach the Storage Side. Use the Storage Bottom as a guide to determine how far away it needs to be from the Side of the desk. Note that the Storage Side will butt up against the Front piece but will not extend all the way to the back of the desk.
Once youve attached the Storage Side, attach the Apron using pocket screws into the Sides and Top and from the Storage Side into the Apron. The Storage Bottom and Storage Side have the same depth, use the Storage Bottom as a guide on the opposite side of the Storage Side to press the Apron against so you screw it in straight.
Remember, the Apron will not sit flush with the back of the desk. Heres a rear view.

Step 5

Attach the Storage Bottom using 1-1/4" pocket holes as shown. If youre installing the optional leveler feet do so now.
The main part of the desk is now complete.

Step 6

Cut out the components for the Shelf. These include the Shelf, 2 Shelf Sides, Paper Tray and Tray Supports.  Apply veneer edging all the way around the Shelf, on 3 edges of the Papery Try (not the edge touching the side), on the 2 short edges of each Side and on the 2 long edges of each of the Tray Supports.
Begin shelf assembly by attaching the two Shelf Sides to the Shelf Top using 1-1/4" pocket hole screws as shown.

Step 7

Drill 1 pocket hole in each of the tray supports to attach it to the top. The pocket holes should be on the inside of the support. Use the Paper Tray butted up against the side where youd like to install as a guide to determine how far away the Supports should be. The tray supports should be evenly spaced 1.5" apart with the two end pieces flush with the edges of the Shelf Top.

Step 8

Now attach the paper tray at the midpoint of the sides and supports to split the space evenly using 1-1/4" pocket hole screws as shown. 3 into the Shelf Side and 1 into each Tray Support.

Step 9

To prevent the shelf from sliding around on the desk but still be able to easily remove the shelf at a later point if desired well be using 2 shelf pins to anchor the shelf to the desk.
Begin by placing the shelf on top of the desk and aligning it flush with the sides and the back of the desk top. Using a pencil, mark a vertical like halfway into the shelf side extending down into the side of the desk top as shown.
Use a square to transfer the marking onto the desk top as well as the bottom of the shelf side. Measure in 3/8" on that line and mark it. Using the shelf pin drill bit drill a hole into the top of the desk as well as the bottom of the shelf side. Do this on both ends for a total of 4 holes, 1 in each shelf side bottom, and two on the desk top. 
Take your time and be very careful with these measurements so they line up properly. Once you have all 4 holes drilled, fine tune them by slightly deepening or widening the holes in the Shelf Sides. Finally insert a shelf pin in each hole on the Desk Top and slide the Shelf onto them.

Step 10

Your desk is now complete and is ready to be finished with either primer/paint or stain/polyurethane or a combination of the two. It will be easier to finish some sections if you take the desk apart first. Just follow these directions backwards to take everything apart. Then follow the directions on how to put all the pieces together again.
Read More..

SOFA TABLE FROM A SEWING TABLE parts used to build


I built this sofa table starting with a sewing machine cabinet I purchased at a thrift store.
The finish was in fair shape but many of the moving wood parts didnt work properly anymore,
and the machine wouldnt lift out of the cabinet to use.
 
The legs are what really caught my attention from across the store.
 
 
Once I started to work on removing the machine I found a makers mark on the cabinet.
 
 
Made In Yugoslavia ... The machine is a Piedmont from the Hudsons Bay Company.
 
 
Anyone need parts for their Piedmont?
 
 
I was able to take the whole cabinet apart to start rebuilding a longer table.
I used a kick board for the front, and aged, stained, and waxed some new wood for the top.
 
 
Heres a close up of the finish I created for the top.
 
?
 
This sofa / console table went to its new home shortly after I finished it.
Read More..

HOW TO GET MORE THAN DINNER FROM YOUR DINING TABLE spanish console desk

Kamis, 04 Februari 2016


Everyone knows I love to cut up furniture to create new and amazing pieces.
This next project was no different.
I took an unwanted 80s dining table and cut the ends off to make 2 console desks.
 
 
I finished them both in very different styles, one in a sea side blue and the other an aged spanish white.
 
I needed back legs to finish off both tables you can see where they came from here:
http://blogspot.ca/2012/07/how-to-turn-4-legs-into-1-cheries.html
another interesting project of mine.
 
It has a faux glazed Venetian plaster look to the top.
 
 
Read More..