Tampilkan postingan dengan label drawers. Tampilkan semua postingan

REBUIDING ANTIQUE DRESSERS replacing drawers

Minggu, 01 Mei 2016

Both of these dressers where curb side finds. They were from different homes
during a community clean up week and understandably destine for the dump.
Not many ppl could or would have wanted to save them, they were that bad.
It is hard to know where to start explaining what happened.
But I will start where you can see there is something wrong.
In this fairy tale picture of the first / white dresser you see no top drawers.
This is correct ... absolutely no drawers or parts could be found in the rest of the rubble pile
during the time I was strapping her to the roof of my SUV and getting hoots and haulers
telling me what a great find I got.
"Ya right buddy get a closer look then tell me that."
I ended up making new drawers!
Okay I did not make brand new ones, thats not what I do here or even what I suggest you do.
I was lucky enough to have some old desk drawers that I was able to make work after cutting.
They were the right height but too long and a bit narrow.
After altering the drawers so they werent so long I had to remove and replace
the middle supports inside the dresser because the new drawers were narrower.
Get ready for the technical diagrams ...
if you have a short attention span, just like pretty pictures, or simple never plan to do this yourself
 skip past the next 3 images.
The dresser is laying on a table and on its back to make working inside easier.
You have made it past the how things work section ...
Now enjoy the rest of the pictures.
I also removed and replaced the original vertical divider on the front with something wider.
I promise it really is the same dresser.
There are a lot more details to share that went into this dresser and the other, like
repairing broken drawers,
rebuilding a drawer you only have half of,
rebuilding missing applique bits,
gluing veneer down on countless edges
gluing bubbled veneer in the center of a surface
filling in missing veneer
replacing an apron,
and how about
building a complete back for a dresser,
but all this in due time.
Read More..

ENJOYING PINTEREST oak bedside drawers

Sabtu, 16 April 2016


Looking through Pinterest for inspiration and seeing my own photos pop up is a blast,
but I think I enjoy reading the comments added to my pictures even more.
It helps me focus on what extra information folks might be looking for.
 
This image of our bedside nightstands is a big hit over at Pinterest.
 
 
One comment added to the photo reads ...
"I would love to do that with a nightstand I have,
but it would have to have some really strong support; it is heavy!
Also, I think it would be too tall to use comfortably."
 
Ive just finished 2 similar bedside drawers this past week and Ill tell you they are both very heavy.
The legs used to raise them up are secured with glue and screws and if your install is thought
out and executed well there would be no issue.
 
Here is a link to an article I wrote with some photos of a leg install:
http://blogspot.ca/2012/03/part-i-leg-up-adding-legs-to-furniture.html
 
Remember I use vintage pieces to build with
so typically made of hardwood these legs have been around for years already and are still going strong.
 
 
The particular legs I used for my bedside drawers were taken from elaborate dining chairs,
I personally like to have my bedsides surfaces higher than my mattress.
 
 The legs below are shorter and are both different lengths,
so there are options as to how tall you lift your nightstands.
 
Here is another link to an article and photos of where these legs can be salvaged from:
http://blogspot.ca/2013/03/where-do-u-get-ur-legs-nightstand.html


Read More..

REPAIR TIPS AND TOOLS rebuilding drawers

Senin, 28 Maret 2016

When we last left our kids the white princess found her lost drawers.
This adventure is all about our pesky little blue boy getting his drawers fixed.
We can get a good view of what is left of the drawers from the backside.
There isnt much.
When Im working with drawers and nails my all time favorite tool is this pair of wire cutters.
They are a simple inexpensive plier type tool found at most hardware stores.
With a little persuasion you can get underneath the head of most nails.
You can pull nails out with them, you can cut nails off with them.
You can usually get inside a mortise joint to get a nail slid out.
My little wire cutting wizards are also very helpful when hammering nails in.
I use the pliers to hold short nails that I want to nail in,
like here when I secured one of the drawer bottoms into place. 
Another useful tool for removing nails and taking things apart is a long flathead screw driver.
The sharper the better.
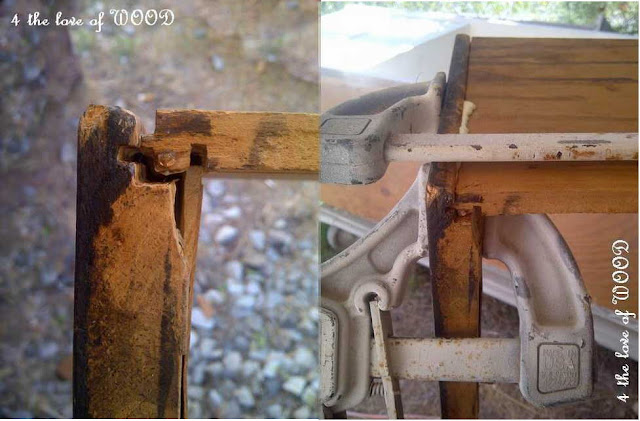
Glue, clamps, and even masking tape are all very useful for repairing drawers,
just make sure your joints are already nice and tight when using the tape.
The color and finish is amazing in person.
A very hot topic I will do my best to address soon is
VENEER ... and what to do with it.
Mean while for those asking for updates on Mr. Georges Etsy shop
there have been several additions to his inventory lately you should check out.
And his candles seem to be a hot item, Ive nicknamed them
The MANMADE candle
Read More..

R UR DRAWERS TIRED blue tall boy

Rabu, 17 Februari 2016


Time to show you some tips and tricks to refreshing your drawers.
 
 
Here is how this dresser transformed on the outside.
 
 
The color is just amazing distressed over the dark stained wood.
 
 
The dresser was in decent shape with only a few repairs needed.
The biggest problem was on the inside.
 
 
 The drawers were lined with gold and black MacTac shelf liner.
Im sure once upon a time marbled black MacTac was very desirable,
 
 BEFORE                                                       AFTER
 
but its not just about pretty paper.
 
Everything about the interior was dirty and worn out.
 
So I removed the sticky black paper, pulled all the staples that also held the paper in, removed the
gluegun glue that also held the paper in, and then washed the entire drawer with soap and water.
 
 Another simple trick is to lube your drawer runners so they run in and out much easier.
You can use a candle or a bar of soap by simply rubbing them along the bottom of your drawer.
 
 
Because I have my furniture paste wax handy most of the time I quickly paint some on the inside
along the drawer supports and even on the inside walls where the drawer might rub. 
 
I finished these drawers off by lining them with a prepasted wallpaper.
I do offer a tutorial here about how to install unpasted wallpaper.
Here are some new treasures you can find on FIRSTFINDS etsy ...
 
sharing with
?
Read More..