Tampilkan postingan dengan label antique. Tampilkan semua postingan

THE BIRTHDAY CHAIR antique white chair

Rabu, 11 Mei 2016


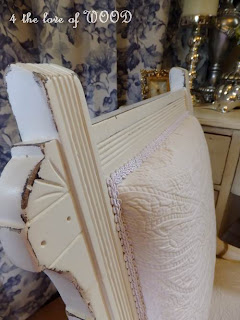
I finished painting and upholstering that green vintage desk chair
I showed you last week. It was done for a special little girls birthday.
I have a lot of ppl ask if upholstery is easy,
my answer is usually always the same.
It is the tear down that is horrible.
You are dealing with rusty staples and tacks, and this chair had been
re-upholstered before, making it almost impossible to get all the old staples out.
I actually used an angle grinder to deal with most of them. (dont do this at home)
Sometimes you also find animal hair, grass, cotton, and burlap,
all of which are dusty and dirty. So this is not my favorite thing to do.
Once I get past all that and start to rebuild, repaint, and reupholster
I find it fun!
Read More..

REBUIDING ANTIQUE DRESSERS replacing drawers

Minggu, 01 Mei 2016

Both of these dressers where curb side finds. They were from different homes
during a community clean up week and understandably destine for the dump.
Not many ppl could or would have wanted to save them, they were that bad.
It is hard to know where to start explaining what happened.
But I will start where you can see there is something wrong.
In this fairy tale picture of the first / white dresser you see no top drawers.
This is correct ... absolutely no drawers or parts could be found in the rest of the rubble pile
during the time I was strapping her to the roof of my SUV and getting hoots and haulers
telling me what a great find I got.
"Ya right buddy get a closer look then tell me that."
I ended up making new drawers!
Okay I did not make brand new ones, thats not what I do here or even what I suggest you do.
I was lucky enough to have some old desk drawers that I was able to make work after cutting.
They were the right height but too long and a bit narrow.
After altering the drawers so they werent so long I had to remove and replace
the middle supports inside the dresser because the new drawers were narrower.
Get ready for the technical diagrams ...
if you have a short attention span, just like pretty pictures, or simple never plan to do this yourself
 skip past the next 3 images.
The dresser is laying on a table and on its back to make working inside easier.
You have made it past the how things work section ...
Now enjoy the rest of the pictures.
I also removed and replaced the original vertical divider on the front with something wider.
I promise it really is the same dresser.
There are a lot more details to share that went into this dresser and the other, like
repairing broken drawers,
rebuilding a drawer you only have half of,
rebuilding missing applique bits,
gluing veneer down on countless edges
gluing bubbled veneer in the center of a surface
filling in missing veneer
replacing an apron,
and how about
building a complete back for a dresser,
but all this in due time.
Read More..

MATCHING ANTIQUE DRESSERS 1920s

Senin, 15 Februari 2016

 
I REBUILT A WONDERFUL PAIR OF 1920S ANTIQUE DRESSERS.
 
Oddly enough these 2 dressers are the exact same size.
One is finished in Old White over Aqua and the other is Aqua over Old White.
 These beautiful dressers were both on their way to the dump.
I took lots of photos while building them.
I will be sharing the BEFORES and the many fixes over the next few days.
UPDATE:

http://blogspot.ca/2012/07/the-prince-princess-replacing-drawers.html
http://blogspot.ca/2012/07/repair-tips-and-tools-rebuilding-drawers.html 
Read More..