

I excersize alot but I am not a memeber of a gym or anything like that. I dont want to have to spend the money on a gym membership when I can get a better workout at home.
My older sister has moved out of the house and I now have the upstairs to myself. I have turned her old bedroom into my excersize room, how great! My personal gym consists of; 7 dumbells (2 45lbs, 2 35lbs, 2 10lbs, 1 40lbs), a basic weightbench that can be adjusted to various inclines, a balance ball (the big beachball thing), a pull-up bar that hangs in the door-frame, and an eliptical machine. Other than the eliptical, everything is pretty cheap. The only reason I have the eliptical is because my mother wanted to start excersizing so she bought the eliptical but NEVER even go on it, so I have it now.
With this meager bit of equipment, I think I get a great workout.
Freeweights (dumbells) give you a better workout than the gyms fancy excersize machines. The machines kind of "assist" you in the movements, the guide and balanace the weight. With free weights however, your muscles have to work harder to balance and steady the weight which gives you a much better workout and builds a wider variety of muscles. With machines, specific muscles are targeted rather than a large number of different muscles.
So, if you want to start working out without having to spend much money, then dumbells are definately the way to go!
Read More..
My older sister has moved out of the house and I now have the upstairs to myself. I have turned her old bedroom into my excersize room, how great! My personal gym consists of; 7 dumbells (2 45lbs, 2 35lbs, 2 10lbs, 1 40lbs), a basic weightbench that can be adjusted to various inclines, a balance ball (the big beachball thing), a pull-up bar that hangs in the door-frame, and an eliptical machine. Other than the eliptical, everything is pretty cheap. The only reason I have the eliptical is because my mother wanted to start excersizing so she bought the eliptical but NEVER even go on it, so I have it now.
With this meager bit of equipment, I think I get a great workout.
Freeweights (dumbells) give you a better workout than the gyms fancy excersize machines. The machines kind of "assist" you in the movements, the guide and balanace the weight. With free weights however, your muscles have to work harder to balance and steady the weight which gives you a much better workout and builds a wider variety of muscles. With machines, specific muscles are targeted rather than a large number of different muscles.
So, if you want to start working out without having to spend much money, then dumbells are definately the way to go!
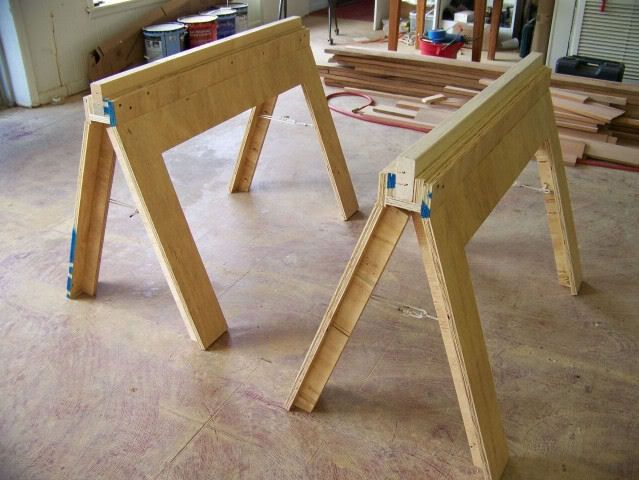 I built a set of these about three of four weeks ago and have been using them on remodeling and construction jobs and they are holding up great. I have had easily over 100 8 pieces of tongue and groove pine on them along with a miter saw and they never showed any signs of weakness. Everyone who comes to the jobs takes a close look at the sawhorses and asks my boss man where he got them, it feels good when he points at me and says "He built them, not me".
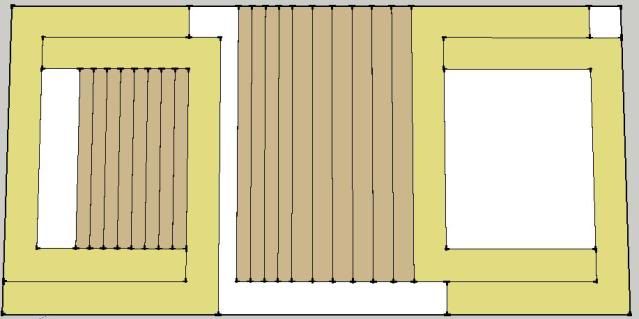 The "U" shaped leg panels are 28" tall and about 42 15/16" long and 5" wide on all three segments. When it is laid out on a sheet of plywood I center my saw blade on the line since I am using both pieces on either side of the blade.