Tampilkan postingan dengan label with. Tampilkan semua postingan

HOW TO DEMOLISH A DRESSER WITH A VEHICLE poor george

Kamis, 19 Mei 2016


Most of my current project are all still in some unfinished state but I do want to share with you
what happened earlier today.
 
Cue the photographic evidence ...
 
thats what you get MDF
 
While backing out of the driveway some ones tire caught the edge of this
dresser and demolished it in a split second. I had just got out of the shower and was in a bathrobe when I heard the commotion. As Im flying out the door to find out what has happened I hear a familiar voice calling my name.
 
 
In Georges defence we had so many other furniture pieces to move yesterday
and quite a few other things to deal with I forgot to get the dresser moved off the driveway. 
 
Most ppl who have met George know how wonderfully friendly and kind he is.
Here are a few more facts about George ...
 
- Hes college educated with a bachelors degree
and originally from New Brunswick (east coast) where he worked for NB Power for 23 years
- Hes coached hockey most of his adult life and took teams on tour to Europe
- Early in his teens the NHL were scouting him but he liked playing in a band more.
- He lost his father in a plane crash over 30 years ago.
- Hes been a director on 2 non profit boards here in Vancouver
- He donates to charity every chance he gets and especially at Christmas
- He was a business man wearing a suit most days before I met him.
- He had never been to a yard sale before me and now he brings home roadside treasures.
 
 
3 of the furniture pieces he was helping me move yesterday were these large dressers
I was painting for a local extreme makeover.
 
 
I also had a couple of photon shoots to get through including this vintage country display cabinet,
 
 
and this outdoor bedroom scene.
 
 
The weather has been amazing and hot so Im spreading out and have projects all over
which is taking away from my time to write about each of them for you.
The photos are all being taken and Ill be able to
show you the ins and outs of most of them when the weather turns.
 
As for the the dresser ...
 
 
I have less demolishion to do and most importantly George is forgiven.


?
Read More..

WHAT TO DO WITH A SHRIVELLING PUMPKIN

Selasa, 17 Mei 2016


This is our Canadian Thanksgiving long weekend.
Most of these photos were taken of Mrs. Ps Thanksgiving table I put together last week at The
 Passionate Home. Im thankful for many things especially the opportunity to step into someone elses
 shop and decorate to my hearts content. This time I even got to snack on some of the props.
 
 
I am also thankful for George.
Since I met him he always puts an apron on this weekend and serves a nice turkey dinner.
For those that ask me "what cant you do?" .... cooking a turkey is near the top of my list.
 
Mrs. P is going on vacation for awhile but plans have already been set for Christmas
decorating at TPH in November.
 
And before I leave you I have one tip for the season.
It is for the pumpkin carver in the family.
 
 
When your carved pumpkin starts to show signs of shrivelling on the front porch run a nice cold bath in your tub to rehydrate him and you can get him back on display in a few hours good as new.
I use to carve pumpkins professionally, a little cinnamon sprinkled on the inside of the lid offers a nice aroma as the candle warms it up.
 
 
HAPPY OCTOBER EVERYONE, ENJOY THE COLORS OF THE SEASON!!
 
 
Read More..

VENEER edge gluing with gravity

Rabu, 04 Mei 2016

Heres the start of the much anticipated VENEER series.
I have many tricks for dealing with veneer issues before painting furniture.
With vintage furniture, veneer refers to thin slices of quality wood, usually
thinner than 1/8 inch, that are glued onto panels of a lesser grade woods.
Veneering is an ancient art, dating back to the Egyptians who
used veneers on their furniture and sarcophagi.
The first step in any DIY veneer repair is to establish how bad the damage is
and what route to take. I will go over edge gluing this time and eventually
share how to glue bubbles, fill missing areas, and the dreaded removal of veneer.
It is actually very simple but youll just have to wait and see.
Many pieces of vintage veneered furniture have some edge lifting,
usually along the bottom.
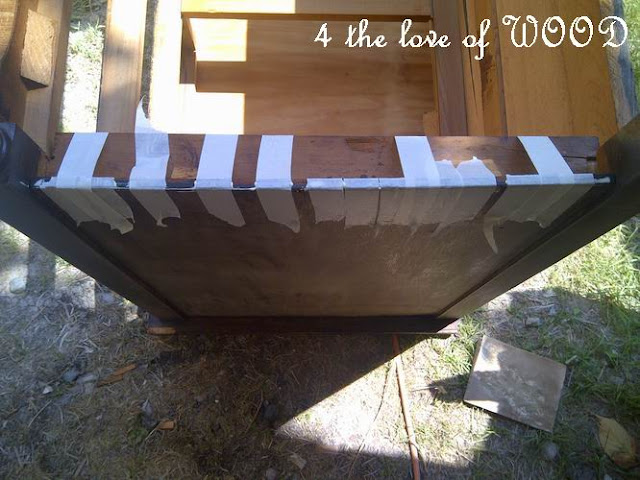
Its a simple matter of using wood glue to secure the veneer back into place
and using masking tape to hold it down while it dries.
Use gravity!
Turn your piece of furniture over to get the glue run down in behind the lifting veneer.
I use a wet sponge to clean up any access glue before taping the edges.
Lay your tape on the veneered surface first and pull it tight over the edge.
Your drying time will vary with climate and temperture,
but a decent wait time would be 4 hours under normal circumstances.
Now go forth and Do it Yourself!
Read More..

A DESK WITH A BEFORE AFTER chocolate tuxedo desk

Senin, 25 April 2016


I put together a new before and after photo to share a desk I finished.
 
 
BEFORE                                              AFTER
 
 
 I know a desk was not in the list of upcoming projects early this week and I never know how these
pieces creep their way into the process but no matter the desk is here and looking quite dapper.
 
 
The body is painted in a distressed creamy white, it has vintage industrial pulls added,
and the drawer faces are the original rich chocolate stain with a wax finish.


Read More..

Why I train with free weights

Selasa, 19 April 2016

I excersize alot but I am not a memeber of a gym or anything like that. I dont want to have to spend the money on a gym membership when I can get a better workout at home.
My older sister has moved out of the house and I now have the upstairs to myself. I have turned her old bedroom into my excersize room, how great! My personal gym consists of; 7 dumbells (2 45lbs, 2 35lbs, 2 10lbs, 1 40lbs), a basic weightbench that can be adjusted to various inclines, a balance ball (the big beachball thing), a pull-up bar that hangs in the door-frame, and an eliptical machine. Other than the eliptical, everything is pretty cheap. The only reason I have the eliptical is because my mother wanted to start excersizing so she bought the eliptical but NEVER even go on it, so I have it now.
With this meager bit of equipment, I think I get a great workout.
Freeweights (dumbells) give you a better workout than the gyms fancy excersize machines. The machines kind of "assist" you in the movements, the guide and balanace the weight. With free weights however, your muscles have to work harder to balance and steady the weight which gives you a much better workout and builds a wider variety of muscles. With machines, specific muscles are targeted rather than a large number of different muscles.
So, if you want to start working out without having to spend much money, then dumbells are definately the way to go!
Read More..

DIY Folding Sawhorses Version 2 0 with Free Plans

Sabtu, 16 April 2016

I am calling this free plans, I have the cutout photo of a sheet of plywood with the dimensions on it. The rest pretty straight forward I believe. But, while I was building this set I was video taping a how to video and hopefully that will be up and running online soon which should make everything very simple.
The original sawhorse design was a great one, the only things I really changed for the 2.0 version were the height of the horses, the width of the horses, and the width of the leg panels. The changes made now allow for nearly, if not all of the materials to be cut out of one sheet of plywood (on the computer it says it can be done, but when I tried I failed somehow). The working height could be lowered still to enable you to get everything out of one piece except for the 2x4 top piece, but that would lower the working height to a level to low for my personal preference.
The working height in version 2.0 is approximately 31" which uses a leg panel height of 28", and the width of the sawhorses are nearly 43". The width of a leg panels is 5" which allows you to cut two leg panels out of a 48"x33" section of 3/4" plywood. It may be difficult to understand but I will have a image of the cut list soon which will help clear everything up.
Everything else is the same as the original version.
I built a set of these about three of four weeks ago and have been using them on remodeling and construction jobs and they are holding up great. I have had easily over 100 8 pieces of tongue and groove pine on them along with a miter saw and they never showed any signs of weakness. Everyone who comes to the jobs takes a close look at the sawhorses and asks my boss man where he got them, it feels good when he points at me and says "He built them, not me".
The construction is pretty simple and I think you should be able to simply recreate your own. I did however make a cut list type thing on Sketch up that shows how you can get the pieces easily out of one sheet of plywood.
The "U" shaped leg panels are 28" tall and about 42 15/16" long and 5" wide on all three segments. When it is laid out on a sheet of plywood I center my saw blade on the line since I am using both pieces on either side of the blade.
The rest is pretty easy, 6 pieces 3" x about 42 15/16" (four of them with an 18* bevel cut down one long side) and 4 at 2". Then from the inside of a leg you cut 8 pieces that are used for the inside of the legs for support.
Here is a video helping with the building process. I go into some detail about assembly and remind you of a few things, check it out.
More detailed photos and descriptions are availiable in this post that should aid in the the building process.
If anyone has and questions of comments feel free. Dont forget about The Woodworking Trip, there should be a video on these things coming soon. Thank you!
Read More..

How To Cut Plywood With A Circular Saw

Senin, 04 April 2016

Getting accurate, straight cuts on full sheets of plywood or MDF can be an expensive proposition. The best way to do it is with a good, heavy table saw. If youre limited on space you can also use a plunge cut track saw like the Dewaltcircular saw guide will help you make accurate rip and cross cuts in full 4 x 8 sheets of plywood.
Since this circular saw cutting jig gets placed up against the cut line, it makes it much faster than other cutting guides that require you to offset the guide some distance from the line. The design also helps prevent splintering and tear out of the thin plywood veneer.

What Youll Need

Materials

  • 4 x 8 sheet of 1/4" tempered hardboard, melamine or plywood (3/8" or 1/2" will also work)
  • Appropriate screws or staples depending on material
  • 1 can of Rust Oleum AS2102 Anti-slip Spray Paint
  • Pencil

Step 1

Measure the distance between the edge of the circular saw base and the circular saw blade on the bottom of your circular saw as shown.
Youll be measuring the longer of the two distances. It should be the side opposite where the arbor nut is.
Write down this measurement as youll need it later.

Step 2

Lay the rigid foam insulation on the floor or on a large worktable. The insulation will serve as your cutting surface so you dont have to rig up a bunch of sacrificial boards.
Mark the factory edge of one of the 8 lengths of the hardboard with some arrows and mark a cut line 3" from that edge. 
Set the depth of cut on the circular saw to just over 1/4", the thickness of the panel and cut along the line. If you dont have a way of making a perfectly straight cut dont worry, well only be using the factory edge.

Step 3

Take the circular saw fence to blade measurement you obtained in Step 1 and add the width of the previous cut (3") plus another 4-5" and mark a straight line that distance from your last cut on the hardboard panel and cut out that section. Again it doesnt have to be perfectly straight.

Step 4

Align the first piece you cut on top of the second piece. Make sure the factor edge (marked by arrows) is facing the right. On the right side of the board make sure there is at least the width of the fence measurement from Step 1 plus 1". You can use a large t-square like a drywall square to help keep the pieces aligned.
Screw or staple the top guide to the base. You can glue it in place but using screws or staples will allow you to reposition the guide if the edge starts getting torn up. Make sure the tips of the screws or staples dont poke through the bottom piece or it could scratch the wood youre trying to cut in the future.

Step 5

Place your guide over Take your circular saw and place the base tightly up against the factory edge of the top guide and carefully cut off the excess from the bottom of the guide.
You now have a circular saw guide that will allow you to rip a full length sheet of plywood. Your cut line will be where you place the edge of the guide. This makes it easy to make accurate and straight rip cuts in plywood with a circular saw.

Step 6

On the back side of the guide that will be in contact with the plywood youre cutting, spray an anti-slip spray such as Rust Oleum AS2102 Anti-slip Spray Paint

Using Your Circular Saw Guide

Using your DIY Circular saw guide is easy. You no longer need to know how far the blade cuts from the face like you do when youre cutting with other straight edges.
Lets assume we want to rip a 12" wide board out of a sheet of plywood. Simply place the plywood on top of the rigid insulation and mark a line 12" from one of the edges of the plywood.
Now place your plywood cutting jig on top of the plywood. The jig should be on the keep side of the line and the edge of the guide should be right on the line as shown. Clamp down the guide at each end to prevent it from slipping. Make sure the clamps wont get in the way of the saw.
Set your circular saw to cut just over the thickness of the plywood youre cutting plus another 1/4" (or the thickness of your guide) and carefully cut using your circular with the base pressed up against the guide.

Preventing Tear Out

Keeping the good side of the plywood face down on the rigid insulation, and keeping the depth of cut just below the plywood will help minimize tear out on the bottom of the plywood.
Since the guide is right up against the cut line, it will help prevent tearout on the "keep" side of the cut. To minimize tearout on the waste side you can first use a utility knife to score along the cut line. Placing blue painters tape along the line also helps.
The most important component to reducing tearout though is a good circular saw blade. The best circular saw blade to use for plywood is the Freud LU79R007 Perma-Shield Coated Ultimate Plywood and Melamine Saw Blade, 5/8-Inch Arbor 7-1/4-Inch Read More..

CHEATING WITH CHAIR UPHOLSTERY tip

Rabu, 23 Maret 2016


This is a mini tip to help your fingers and blood pressure get all the way through
removing old fabric from the wood base of your dining chairs.
 
 
Using something to pry the staples with like a flat screw driver
and something to pull with such as pliers, get that fabric ripped from
the wood anyway you see fit. A bonfire is not an option for the upcoming tip to be effective!
 
 
You have now pulled 7 hundred and fifty six staple and along the way you have avoided
the tricky stuff like these clumps from a happy staple user of the past.
Sometimes patience isnt enough to deal with every last staple and messy crap so ... 
 
Pull all the easy ones, anything sticking up but leave the rest ...
then flip your board over and use the clean side.
 
 
This side of the wood has not seen the light of day in countless years and is brand new.
Unless you are the princess and the pea no one will feel or see a few staples left behind hiding
under new foam.
Read More..

BUILDING A CABINET WITH OTHER FURNITURE

 
I built this cabinet using 3 different pieces of furniture, trim, appliques, and 2 pine doors.


A pair of simple nightstands with drawers were screwed together for the base cabinet and the doors
were used to close in the open section of the nightstands for hidden storage.


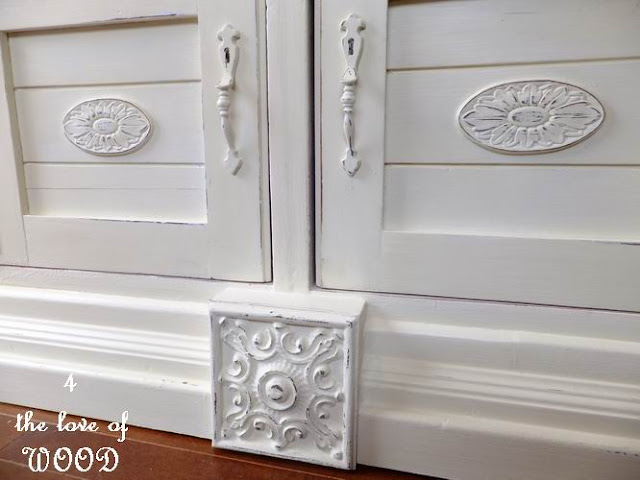
I mimicked the oval shapes in the applique and the drawer handles.
 
 
 BACK                             FRONT?
 
Here are some close ups to help understand how 3 different moldings were used to frame the base.
 
 
The square embellishment (plastic) was attached to a thick square of wood before being installed.
 
 
The top was built using a discarded bookshelf frame and 10" boards
from an old waterbed frame were used for shelves.
The top was trimmed in more moldings and the sides got banister turnings.
Im in love with this new wallpaper and lined everything I could on this piece.
 
The cabinet is built in 2 pieces so it can easily be transported. The top simply sits on the bottom.
And I kept it!
 
*************************************************
 
ALSO ...
Stop in to see whats new in shabby chic white hardware available at firstfinds.
 
There are over 1000 pieces of used hardware to choose from
Etsy Shop.


Read More..