skip to main |
skip to sidebar

This is the final article of the my VENEER series.
Todays article is about how to easily remove large sections of veneer.
Why does veneer start to lift from furniture anyway?
Hands up ... any guesses?
The ladies who have taken my workshop are not eligible so put your hands down.
The answer is
*MOISTURE*
Veneer is typically adhered with water based glues and
when water gets under the edges of the veneer it softens the glue and starts to lift.
I.E.
damp basement,
on a porch in bad weather,
moisture under a potted plant or vase
Once you have made the decision to remove the veneer
set up your furniture so the surface to be worked on is facing up.
Go get a towel big enough to cover the area of veneer and soak it with water.
You do not need hot water but make sure it is saturated but not dripping.
Spread out your wet towel over the veneer to be removed making sure the water
can get absorbed under the edges and open areas to soften the glue.
Here is the
** work smart not hard part **
Time to watch a movie, go to the grocery store, or do the laundry.
In other words leave it alone to do the work for you,
When you come back to the project you should be able to
easily start to lift and peel the veneer away.
ITS REALLY THAT SIMPLE!
The photos I have used for this article were taken over an hour and a half from start to finish.
There is no need to use heat guns, belt sanders, or nasty gauging tools from now on.
Just some more water and some time!!
CAUTION:
for the most part the decision should be made to remove veneer because the alternative is worse
but some veneers are covering up pieced together wood and wood with gauges and holes

Thanks for following along with my VENEER series
The first article explained how to deal with edge gluing loose veneer
The second article detailed filling in missing areas of veneer on painted furniture,
and the third article showed you how to get bubbled veneer glued back down.
Heres the start of the much anticipated VENEER series.
I have many tricks for dealing with veneer issues before painting furniture.
With vintage furniture, veneer refers to thin slices of quality wood, usually
thinner than 1/8 inch, that are glued onto panels of a lesser grade woods.
Veneering is an ancient art, dating back to the Egyptians who
used veneers on their furniture and sarcophagi.
The first step in any DIY veneer repair is to establish how bad the damage is
and what route to take. I will go over edge gluing this time and eventually
share how to glue bubbles, fill missing areas, and the dreaded removal of veneer.
It is actually very simple but youll just have to wait and see.
Many pieces of vintage veneered furniture have some edge lifting,
usually along the bottom.
Its a simple matter of using wood glue to secure the veneer back into place
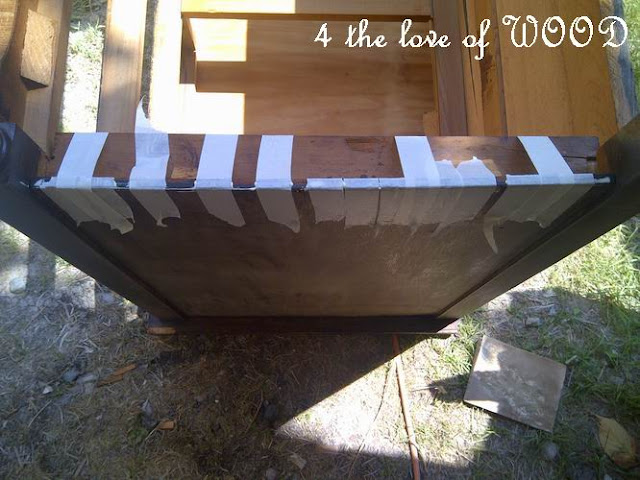
and using masking tape to hold it down while it dries.
Use gravity!
Turn your piece of furniture over to get the glue run down in behind the lifting veneer.
I use a wet sponge to clean up any access glue before taping the edges.
Lay your tape on the veneered surface first and pull it tight over the edge.
Your drying time will vary with climate and temperture,
but a decent wait time would be 4 hours under normal circumstances.
Now go forth and Do it Yourself!
Read More..
I want to show you how I rebuild a missing area of veneer
on a newly finished antique cabinet top that has just been finished.
This is the second article of the much anticipated VENEER series.
The first article explained how to deal with edge gluing loose veneer
Below is our missing bit of veneer we are going to work on.
Start by sanding any loose bits away.
Make a nice big fat centipede of wood filler.
GENTLEY flatten out the filler, over-filling the area.
Let this harden really good, a whole day would be best.
You need it to be solid because now your going to sand it smooth.
Sand your edges as well.
Paint and youre finished.
And here is the whole cabinet once finished.
Read More..
Im repeating the veneer series for those new to my blog,
and for those needing a refresher ...
I have many tricks for dealing with veneer issues before painting furniture.
With vintage furniture, veneer refers to thin slices of quality wood, usually
thinner than 1/8 inch, that are glued onto panels of a lesser grade woods.
Veneering is an ancient art, dating back to the Egyptians who
used veneers on their furniture and sarcophagi.
The first step in any DIY veneer repair is to establish how bad the damage is
and what route to take. I will go over edge gluing this time and eventually
share how to glue bubbles, fill missing areas, and the dreaded removal of veneer.
It is actually very simple but youll just have to wait and see.
Many pieces of vintage veneered furniture have some edge lifting,
usually along the bottom.
Its a simple matter of using wood glue to secure the veneer back into place
and using masking tape to hold it down while it dries.
Use gravity!
Turn your piece of furniture over to get the glue run down in behind the lifting veneer.
I use a wet sponge to clean up any access glue before taping the edges.
Lay your tape on the veneered surface first and pull it tight over the edge.
Your drying time will vary with climate and temperature,
but a decent wait time would be 4 hours under normal circumstances.
Now go forth and Do it Yourself!
and for the SHOWROOM I have a few additions today that include ...
two aqua blue over green chairs and
 a vintage tool box repurposed into a coffee table / storage trunk
Part 2 of the much anticipated VENEER series.
The first article explained how to deal with edge gluing loose veneer
Below is our missing bit of veneer we are going to work on.
Start by sanding any loose bits away.
Make a nice big fat centipede of wood filler.
GENTLEY flatten out the filler, over-filling the area.
Let this harden really good, a whole day would be best.
You need it to be solid because now your going to sand it smooth.
Sand your edges as well.
Paint and youre finished.
If you need to fill an area on a piece you are not painting, wood filler does come in different wood
colors or you must fill the area with a new piece of veneer.
Heres the third article of the much anticipated VENEER series.
The first article explained how to deal with edge gluing loose veneer
The second article detailed filling in missing areas of veneer on painted furniture.
This time I will show you how to get bubbled surface veneer glued back down.
For these repairs you will need 3 items,
your wood glue, a shape utility knife, and a heavy weight.
In most cases you can see where the veneer has bubbled/lifted but
running your hand over the surface will also help find areas you dont see.
You have to get the glue underneath your veneer somehow.
The next step is the scarey one.
Use your uility knife to cut a slice into the bubble.
Use a sharp knife, and cut in the direction the grain runs.
Apply your glue getting into the cut and under the bubble.
You can squish it underneath the veneer with your finger,
you can use air to blow it under the edges,
do what ever you can think of just be delicate with the edges of the cut veneer.
Wipe up any excess glue with a damp cloth.
Now weigh your repair down.
Below you can see I used a cast iron urn (heavy) on a flat board,
I even used a small bit of folded sandpaper right over the glued spot as a pressure point.
** MINI VENEER TIP **
Wax paper wont stick to glue well.
It is a good buffering material to use
between your repair and any clamps or weights you use.
HAPPY CANADA DAY to everyone and to celebrate ...
todays SHOWROOM addition is a wonderful Lane Aromatic Cedar Lined Chest
Originally made in Ontario, Canada.