Tampilkan postingan dengan label wood. Tampilkan semua postingan

Wood working and a video you must see

Kamis, 12 Mei 2016

Hi Everyone,
Well, I went out and bought a couple of small short pieces of white oak and maple for the tea boxes this morning. I also purchased a thick, very aeromatic piece of pine. It is about 2 inches thick and probably full of pitch. I can hardly wait to turn this! Im going to save the shavings and make a sachet for my closet out of it.
I also have a link on my FB page to the Heritage Craft Association in the UK and they feature all sorts of information about craft making in Britain. A really first rate group of people. They had this video today and I just finished watching it and I want to share it with you. This is exquisite hand crafting.
http://www.finewoodworking.com/item/42136/adrian-mccurdy-furniture-riven-from-the-log
More later,
LaV.
Read More..

FIXING WOOD SPLIT hinge

Senin, 09 Mei 2016


When you have a split in your wood furniture you can stabilize it with a left over hinge used sideways.
 
These photos are taken of the underside of a broken chair.
 
First I glue and clamp the seat back together, let the glue set for a day.
I also stabilize the repair with a hinge screwed over the split on the underside of the chair.
 
 
Here is the fixed chair.
 
HAPPY FIXING
 
 
Read More..

DIY Wood Window Cornice

Selasa, 19 April 2016

A closed top window cornice increases the energy efficiency of window drapes as well as ads architectural interest to your windows. Building your own window cornice will save you a considerable of money over buying a pre-made cornice. They are relatively easy to make and dont require many tools. Making your own also ensures you get the perfect size without having to hire an expensive carpenter.

How Window Cornices Improve Drapery Insulation

Window drapes improve the insulative value of your windows by creating an additional layer of separation between the warm room air and the colder air near the window. Curtains however are open at the top which lets air pass through that insulated pocket. 
During the winter, when you run your heating system, air circulates due to convection. Hot air rises and cold air falls. As the air passes through the top of your drapes it passes in front of the window which cools the air even faster. By preventing the air from passing in front of the window less heat will be lost to the outside and less energy will be required to keep the room warm.
One way to keep the air from passing through the top of the drapes would be to run the drapes from the ceiling down to the floor. If you have very high ceilings, or just dont like the look of floor to ceiling curtains, a closed top window cornice might be a more attractive alternative.

What Youll Need

For this example well be making a window 36" wide cornice with a 34.5" opening. Youll need to size your cornices based on the size of your windows and how you mount your drapes. Youll want to have a couple of inches past your drapery rod on either side to allow space for the drapes to slide without binding against the cornice. Since the curtain rod will be covered by the cornice you can use more affordable curtain rodsBuy Online, Pick Up in Store. Now available at a H
  • 1 - 1 x 6 x 8 S4S Board (appearance poplar is nice but #2 whitewood is much cheaper and good enough for painting)
  • 5 - Crown Molding (fiberboard molding is much cheaper than solid wood moldings and accepts paint well, finger jointed is also an affordable option)
  • 5 small beaded molding (such as WM163 11/16 in. x 1-3/8 in. x 8 ft. Primed Finger-Joint Poplar Base Cap Moulding
  • 2 corner braces (for mounting to wall ex: Everbilt 1-1/2 in. Zinc Plated Corner Braces)
  • 4 drywall screws (for brace to wall)
  • 4 3/4" wood screws (for brace to cornice)
  • Wood glue
  • Sandpaper assorted grits
  • Sealing Primer
  • Semi-gloss paint (to match other trim)

Tools

  • Miter box or power miter saw for square and miter cuts.
  • Power drill
  • Kreg pocket hole jig
  • 3/64" Drill Bit
    • 1 x 36" long Front
    • 1 x 34.5" long top
    • 2 x 5.5" sides

    Step 2: Attach Sides

    In each side piece, drill 2 pocket holes about 1 1/2" away from the edges using the Kreg Jig and screw into the front piece using Kreg SML-C125 screws as shown below. 
Make sure the pocket holes are on the inside of the cornice box.

Step 3: Attach Top

Attach the top using 9 pocket holes and screws as shown below:
The top will fit inside the front and sides.
If youre willing to spend a bit more you can use a piece of clear acrylic sheet cut to 6 1/4" x 36" and screwed down onto the top instead of using wood. This will still give you the enclosed top for energy efficiency but will also allow light to pass through. It creates a nice uplight effect when your drapes are closed during the day.
At this point your basic cornice is done. If youd like you can just paint it as is or cover it with fabric. To give it a little more visual interest well continue with adding trim.

Step 4: Sand

Sand the outside surfaces of the cornice using 120 grit sandpaper to smooth out any rough spots. Follow up with another sanding using 220 grit sandpaper. Make sure to sand the exposed end grain of the front piece to smooth out any roughness from sawing.

Step 5: Attach Bottom Trim

Weve chosen a small decorative base cap molding to apply along the bottom of the cornice. Cut the molding at 45 degree angles in your miter box or power miter saw at the corners. Make sure the back of the molding is pressed up against the back fence of the miter box/saw when cutting.
Attach the trim to the bottom of the cornice box using wood glue and the 3/4" brad nails. Use the 3/64" drill bit to drill pilot holes so the trim doesnt split. Be careful because the bits are very thin and can span easily if not drilling straight. Follow directions and safety instructions on your tools, wearing safety glasses is also a good idea.

Step 6: Attach Crown Moulding

The crown molding give the window cornice a more interesting shape. It is important to get the mitered cuts right so you get nice crisp corners. To get the right angle set the miter saw to 45 degrees in the appropriate direction (its a good idea to mark which direction the cut will be with a pencil) and place the crown molding in your miter box or saw upside down and backwards (shown right). Its important that the flat edge on bottom and top of the crown molding are flat up against the base of the miter saw and the back fence in the same position as they will be installed. This will insure you get the appropriate angle when you make the 45 degree cut.
The corners on the crown moulding are more critical than on the base moulding so double check your measurements and take your time. Its better to go a little long and then to recut. Especially for the side pieces or if youre using a power miter saw.
Attach the crown moulding to the top of the cornice box as shown, using wood glue and 3/4" brads. Use a 3/64" drill bit make pilot holes. Make sure to glue the crown moulding pieces together at the corners as well. One brad at the top will help keep the pieces joined together.

Step 7: Fill and Sand

Once the glue has fully dried as per the instructions on the bottle, fill any holes or gaps in the trim with a wood filler. Lightly sand with 220 grit sand paper to touch up.

Step 8: Prime, Sand and Paint

Brush and wipe up any sanding dust off the cornice and then brush on a good quality sandable sealing primer. After the primer dries hard, lightly sand with 220 grit sand paper to remove any brushstrokes and other imperfections.
Wipe down the cornice and with a good quality brush and a good quality semi-gloss paint (Cabinet Coat, Benjamin Moore Satin Impervo Oil Based, Benjamin Moore Aura Semi-Gloss) apply 2 coats of paint in the color of your choosing to the cornice following the paint manufacturers instructions.

Step 9: Install Cornice Over Window

Allow the paint on the cornice to dry and cure fully before attempting to mount it. 
Determine where on the wall youd like the cornice to be. Attach one of the corner braces on the wall using 2" or longer drywall screws about 10" in from one end of the cornice. Attach the 2nd corner brace level with the first in the same fasion 10" from the other end of the cornice. There should be a big header over the window to screw into but if you are mounting the cornice higher you will want to make sure you screw into studs using 2" or longer drywall screws.
Place the cornice on the brackets and secure to the underside of the top of the cornice box using 3/4" flat head wood screws.
Read More..
0 komentar

Selkie Wood Works Welcomes Tiger Tigre

Selasa, 05 April 2016

Hello Everyone,
You may remember several months ago I made a small bowl out of yellow poplar. Well, Ive given the bowl to Tiger Tigre, a well known tiger who is a crusader for the rights of tigers, and people, everywhere. He had gone on a trip to the woods in Northern Minnesota and had gotten a little scruffy and so I was glad to donate the bowl so he could use it as a bathtub. Here is a photo of that dapper fellow in his tub:
Well done Tiger T!
You can follow Tiger Ts adventures on Facebook.
VW
Read More..

SCROLLED WOOD WORK Parlour Table

Senin, 28 Maret 2016


Okay this post cant wait any longer.
It is long over due as I finished this table, Parlour Table that is, days ago.
However I have lost the before picture.
I know there was one taken I have seen it, but do you think I can find it ... NO!
 
 
So with your imagination think hard about a simple yet dark oak wobbly table.
Have you got the image in your mind?
Well it wont work if you keep looking at the nice ornate white one I am showing you.
Close your eyes and think hard.
 
 
I painted it in old, distressed the edges, and waxed it with Minwax.
 
But before doing all the pretty stuff I had to make the table strong and stable again.
I tightened every joint possible with clamps and glue but it still shifted to and fro,
and it needed a little character added.
 
Thats where the fancy bits come in.
The scrolled wood work you see at the back
stabilized the shifting and took a ho hum piece of furniture and made it attractive.
My scrolled wood work was purchased while on a road trip into the US,
and it was a second hand find and I still have 2 more of them to play with.
Maybe one day I will get a scroll saw and try my hand at creating these lovely designs.
 
As you can see I didnt stop there,
I also cut up some more of those plastic wall decorations to add some ornate details
at the front edges of both shelves.
 
 
She has now found a new home.
 
 
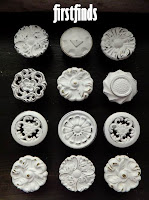
Stop in to see whats new in shabby chic white hardware available at firstfinds.
There are over 1000 pieces of used hardware to choose from


Read More..

CHARITY RESULTS SMELLY WOOD

Kamis, 24 Maret 2016


Last weeks Charity Auction was a huge success. Thank you to everyone who came out
to attend the event. The evening brought over $4000 in donations for the Langley Christmas Bureau.
 
My chair went up for live auction and made $250 on its own.
Many of you have been asking how you can get involved next year. If you want to create a chair,
get involved with some advertising, or be helpful in some other way simply email The Passionate
Home thepassionatehome@telus.net********************************************
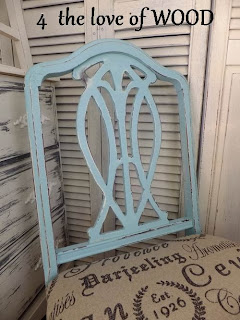
I painted a chair in an aqua blue and upholstered it with this teahouse script fabric. 
***********************************************
Lastly for today I want to share some helpful information for a
question I get asked about often ...
 
 
I have an old dresser that smells to high heaven of old wood. What do you suggest I use to get the old wood smell off the piece? My hubby suggested I use bleach water. I thought to use Simple Green or Murphys Oil soap. Your help is appreciated. 
Wood absorbs odors so washing the surface doesnt usually help.
The best way to combat the smell is to expose the wood to the sunshine. Take the drawers out and let it sun bath for a couple of days.
If the sun isnt shining these days in your neck of the woods, waxing (sealing it in) is another option. This includes waxing all the interior surfaces.
Just brush the wax on when you do inside and let it dry. No removing the excess or buffing.
Having a pretty smelling soap in each drawer or taping a fabric softener to the drawer back can help mask the smell if you want to wait for the sun.********************************************


Read More..

More Friday notes from the wood shop

Jumat, 18 Maret 2016

Well, I went back down to the wood after lunch to take a look at the beech bowl and the honey locust tea box. The beech bowl had really distorted quite a bit and I decided against my better judgement to try and re turn it round again, which predictable results:
It doesnt have enough thickness left in the walls to true it up so this one will have to be tossed.
But the honey locust box is coming out well. Its very rough from drying but it managed to keep its shape. Here are photos of the side and the interior:
This is really going to be pretty when its finished. Im going to need to make a lid for it, the question being what kind of wood to use? It think a yellow, vanilla colored wood would really look great on the box and the type of wood that comes to mind is clear pine. It has a similar grain pattern and a wonderful vanilla yellow color so Im going to take some pine I have in the shop and make a top and see what it look like. If it doesnt work out, then well get a hold of some hickory and try that.
I decided just for the heck of it to take a look at the sycamore bowl:
As you can see its really distorted and it has two cracks in it.
Sometimes theres a lot to be said for kiln-dried lumber. People criticize it as being boring and its true that the wild grain patterns and lovely colors are usually missing from kiln dried lumber. But its is dried out and it doesnt distort after its been cut.  Sometimes working with green unseasoned wood is a lot like having a drama queen in the wood shop. You just never know what they are going to do.
So well be using kiln dried lumber for the tea boxes so come on back and see how this works out.
...sigh...
More later,
VW
Read More..

Trees People and Wood

Selasa, 01 Maret 2016

Good Evening All,
I was browsing around a short while ago and I found this essay by English wood turner Brian Clifford. Its about trees, and wood, and people and the environment and I thought Id share it with you. Heres the link: http://www.turningtools.co.uk/trees/trees2.html
VW
Read More..

The Calico Bowl survives hickory plate and all those wood chips

Jumat, 12 Februari 2016

Well, the calico bowl survived and is going to be claimed by the gentleman who ordered it originally. It looks lovely and it has a polyurethane and oil finish on it. I hope the new owner enjoys it.
Unfortunately my kitchenware line isnt selling well so Im converting some of my cutting boards into plates. I turned a hickory plate this morning. Hickory is a wonderful wood to work with as its very dense and hard and it cuts cleanly and finishes with little sanding needed. Here is a photo of the latest plate:
This plate is getting a Danish oil finish and will be done in a day or two. When the oil is dried, Ill polish it with a little beeswax. Lovely way to finish wood.
Ive done a lot of turning over the past several days and I created a mountain of shavings--two full trash can bags full along with assorted scrap lumber. If anyone in the Twin Cities area would like to have the shavings and saw dust for FREE, let me know and Ill arrange to get it to you.
Im going to take tomorrow off and work on business stuff. Ill be back soon.
VW
Read More..

Bowls bowls bowls and a whole lotta wood shavings

Selasa, 26 Januari 2016

Hi Everyone,
Today Im continuing to work on the walnut bowls and on the laminated Brazilian cherry/black ash fruit bowl from yesterday.
The walnut bowls continue to progress. The bowl that is going to the friend that gave me that giant walnut log earlier this year, is going well. Im done cutting it and Im sanding it smooth right now. Heres a picture:
It is dry and stable and in a couple more days it will be ready for a finish.
Several weeks after cutting this bowl, I cut another bowl. This bowl has been much more problematic: it warped badly and it had some cracks in it. I fretted over this critter for weeks and wasnt sure that I could save it but I gave it a shot and it is turning well too. Ive cut away a lot of the cracking and the bowl has been trued up inside and out so I think this one still has a chance. Ive finished cutting it as well and have begun sanding it. I dont have a picture of it at the moment but I will post one soon.
I also began a bowl a week or two ago out of laminated brazilian cherry and black ash and its turning out super. Here are some pictures:
Black ash, so called because its darker than white ash and often has black streaks in the heart wood, is a wonderfully hard, dense wood that cuts and finishes like a champ and the same can be said of brazilian cherry. They also have a wonderful scent-black ash has a sweet, hickory-like scent and brazilian cherry smells like bath soap. My shop always smells like something (I work right next to some very large, smelly trash cans) but today it was really pleasant. And as I cut down, the black streaks in the wood began to show. Very nice. This will make a really nice Christmas present for someone.  I can hardly wait to put a finish on this bowl. Wow!
Lastly, I dont think there are many occupations that are messier than wood turning. If you look at wood turning shops on line you often see the wood turner standing in mountains of wood shavings and saw dust. I dont let my shop get to that point, but I do put out the shavings in prodigious amounts:
And I just produced this in the last 2 days! Does anyone have an idea as to what I can do with all of this wood? I should have a contest-hmmm....maybe I will.....Ill give it some heavy thought. In the meantime if you would like to have all this wonderful wood, let me know. Its going in the trash if I cant find a use for it.
And tomorrow Im going to have a little procedure done on my back. It seems my MRI horrified a few of my doctors ( and me too!) so Ill be resting tomorrow. But Ill be back soon with the bowls and other adventures in the wood shop so get some coffee, put your feet up and stay tuned.
Thanks for dropping by,
VW.
Read More..